http://www.splitcoaststampers.com/gallery/photo/1829716?&cat=14545
http://donnasstampandscrap.blogspot.com/2010/10/ideas-for-using-your-designer-paper.html
http://www.splitcoaststampers.com/gallery/photo/1829544?&cat=14545
http://www.splitcoaststampers.com/gallery/photo/1830042
http://www.splitcoaststampers.com/gallery/photo/1829894?&limit=last1
http://addinkandstamp.blogspot.com/2010/10/nine-patch-quilt-block.html
http://bon2stamp.blogspot.com/2010/10/another-post-today.html
http://www.splitcoaststampers.com/gallery/photo/1829686?&limit=last1
Saturday, October 30, 2010
Friday, October 29, 2010
PKS Challenge #4 - Snowman Ornament
The Peachy Keen "Let's Face It Fridays" Challenge #4 was for us to create an ornament using a PKS face stamp. This was the perfect opportunity to share my rolly polly snowman idea. Step by step instructions are below. Please visit the PKS Challenge site HERE to check out the other great design team ideas! If you have any Peachy Keen face stamps, you can play along in the challenge for a chance to win the NEW chipboard ornament shapes and stamp set!


Supplies Needed:
*All punches listed are Stampin' Up!
1 3/4" Circle punch - SNOWMAN BELLY
Ornament - HEAD
Small Oval punch - BOOTS
Medium Oval Punch - BOOTS & MITTENS
Modern Label - ARMS & LEGS
Large Oval Punch - HAT BRIM
Scallop Oval Punch - HAT BRIM
Full Heart Punch - HAT
Word window Punch - MITTEN CUFFS
Small Heart Punch - MITTEN
Boho Blossoms Punch - HAT
White cardstock (I used shimmery white)
Black cardstock for boots
Patterned papers for mittens and hat
Ribbon of choice for scarf
black ink pad
pumpkin pie marker
pink pirouette ink pad and sponge dauber
glue, dimensionals, crop-a-dile, bone folder, 1/8" taffetta ribbon or cording
1) Punch out 16 white 1 3/4" circles. Fold each circle in half. Use a bone folder to sharpen the folds.
2) Start with the first circle folded in half. Put adhesive on the top side and attach another circle half to it. (I recommend applying adhesive to the centers of the circles. This way, the edges will be open and you can slip the head, arms and legs between the layers)
3) Continue to glue and stack the circles together, adding only adhesive to the top of the stack. After gluing all of the circles together, you will have a stack like this.
4) When you take your finger off the stack, it will naturally want to fan out like this.
5) Glue the ends of the fan together to form a ball. This is the snowman's belly piece.
6) Punch out 4 modern labels. Glue these onto the bottom and sides of the snowman for the arms and legs. (if you glued only the centers of the circles, the edges will be open and you can slide the arms and legs between the layers). You may have to clip a little off each end of the label to get the legs and arms positioned properly.
7) For the mittens, punch 2 medium ovals, 2 small hearts and one word window. Cut the word window in half and round out the end on each half to form the cuffs. Glue the cuffs onto the bottom of ovals. Glue the heart onto the back of the mitten for the thumb. Attach mittens to arms with dimensionals.
8) Punch 2 black small ovals and 2 black medium ovals. Cut each end off of the small ovals so that the total length of the piece is 5/8". Glue onto end of leg. Cut the bottom off of medium oval and attach to foot with dimensional. Add highlight with white gel pen.
9) Punch a white ornament. Stamp the face, color the nose and add pink cheeks with a sponge dauber. Apply some glue to the neck of the ornament and slip it between the top layers of the ball (this is where the tip in step 1 comes in handy).
10) For hat brim, first punch half of the large oval. Then, line up the scallop oval over the top of that punched hole and punch the brim. Glue the full heart onto back of head. Attach brim of hat with dimensional. Clip the ends of the small oval to form a point for the hat. Attach with dimensional. Punch a boho blossom and attach to hat (you may want to add glitter to the tassle).
11) Punch a hole in top of hat and tie on a ribbon or cording for a hanger.
Punch Inspiration 10/29/10
I have just a few links today. Please check back at 10 AM today for the PKS Challenge when I'll be sharing a fun punch art holiday ornament idea!
http://jackietopa.typepad.com/addicted_to_stamping/2010/10/punch-art-bulldozer.html
http://www.splitcoaststampers.com/gallery/photo/1829533?&limit=last7
http://flowersparkle.blogspot.com/2010/10/stampers-ten-make-and-take-christmas.html
http://stampingaddict.blogspot.com/2010/10/free-pattern.html
http://www.splitcoaststampers.com/gallery/photo/1829081?&limit=last7
Thursday, October 28, 2010
NEW Christmas Magic Collection
My newest class is complete! This Christmas Magic collection includes the following:
Jolly Old St Nick
Mrs. Clause
Elf Surprise
Moose
Ginger Girl
Each class features full color step by step picture tutorials in pdf format. The designs use all Stampin' Up! paper punches.
$6.00


Punch Inspiration 10/28/10
http://www.rubberroomramblings.com/2010/10/inlaid-embossing-technique.html
http://www.rubberroomramblings.com/2010/10/i-am-addicted.html
http://paperfairykris.blogspot.com/2010/09/trick-or-treating-owls.html
http://www.splitcoaststampers.com/gallery/photo/1828607?&cat=14545
http://www.splitcoaststampers.com/gallery/photo/1828536?&limit=last7
http://wahoohaven.blogspot.com/2010/10/thank-you-for-boss.html
http://www.splitcoaststampers.com/gallery/photo/1827818?&limit=last7
http://papercookies.blogs.splitcoaststampers.com/2010/10/26/a-cardinal-box-cover/
http://www.rubberroomramblings.com/2010/09/pixie-stick-wonder.html
Wednesday, October 27, 2010
Punch Inspiration 10/27/10
Check out this blog for so many great uses of the Stampin' Up! punches!
http://www.stampinpretty.com/2010/10/simple-saturday-thinking-of-you.html
http://www.stampinpretty.com/2010/10/ppa65-bling-and-new-wow-video.html
http://www.stampinpretty.com/2010/10/simple-saturday-for-austin.html
http://www.stampinpretty.com/2010/10/simple-saturday-autumn-spice-is-nice.html
http://www.stampinpretty.com/2010/09/tuesday-tutorial-coordinating-punches.html
http://www.stampinpretty.com/2010/10/guest-stamper-mike-funke.html
http://www.splitcoaststampers.com/gallery/photo/1808174?&cat=500&ppuser=61206
Tuesday, October 26, 2010
Punch Inspiration 10/26/10
http://www.splitcoaststampers.com/gallery/photo/1826734?&limit=last1
http://www.stampinpretty.com/2010/10/mojo162-and-new-video-tutorial.html
http://stampinfunwithselene.blogspot.com/2010/10/very-merry-mojo.html
http://www.splitcoaststampers.com/gallery/photo/1826486?&limit=last1
http://www.splitcoaststampers.com/gallery/photo/1826810?&si=ornament%20punch
http://stampmyday.blogspot.com/2010/10/christmas-card-class.html
http://stampzone.blogspot.com/2010/10/back-to-christmas-card-making.html
http://www.splitcoaststampers.com/gallery/photo/1821200?&si=ornament%20punch
http://www.frenchiestamps.com/2010/10/stampinup-ornament-punch-acorn.html
http://www.splitcoaststampers.com/gallery/photo/1817943?&si=ornament%20punch
Monday, October 25, 2010
Redraw on the Blog Candy
Hi All, the winner of the blog candy drawing for 10/18 did not come forward to claim their prize. I did a redraw from the comments on the PKS Challenge #3 posting. The winner will receive the Cottage Cutz set called "Herby" and the Peachy Keen Cut-Out Pumpkin Faces stamp set. The winning number was #11!

The #11 comment was submitted by Brigitte who had this to say:

The #11 comment was submitted by Brigitte who had this to say:

Congratulations Brigitte! Please email me at needmorestamps@yahoo.com to claim your prize!
Punch Inspiration 10/25/10
http://callalilystudio.wordpress.com/2010/10/24/santa-and-mrs-claus/
http://www.splitcoaststampers.com/gallery/photo/1826461?&limit=last1
http://www.splitcoaststampers.com/gallery/photo/1826079?&limit=last1
http://sarahsinkspot.com/blog/2009/11/punch-art-turkey-with-sweet-treats.html
http://ryemilan.blogspot.com/2009/12/more-christmas-punch-art-tinkering.html
http://ryemilan.blogspot.com/2010/09/raggedy-ann-birthday.html
http://ryemilan.blogspot.com/2010/09/just-clowning-around.html
http://ryemilan.blogspot.com/2010/10/puppy-party-punchie.html
http://jackietopa.typepad.com/addicted_to_stamping/2010/08/punch-art-christmas.html
http://www.stampwithjenn.com/stamp_with_jenn_blog/2010/07/punch-art-christmas-angel.html
Sunday, October 24, 2010
Punch Inspiration 10/24/10
http://jackietopa.typepad.com/addicted_to_stamping/2010/10/stamp-a-stack-planners.html
http://susansdayoffcreations.blogspot.com/2010/10/stacked-blue-birds.html
http://creativewishes.blogspot.com/2010/10/christmas-froggie.html
http://weekendstamper.blogspot.com/2010/10/back-to-prepping-for-craft-fair.html
http://technostamper.blogspot.com/2010/10/hip-to-be-square-well-kinda.html
http://www.stampingmoon.com/2010/10/wicked-tricked-out-cake-mix.html
http://www.stampingmoon.com/2010/09/wicked-eye-ball-treat-trio.html
http://www.stampingmoon.com/2010/07/flower-power-play-date.html
http://www.stampingmoon.com/2010/07/thanks-2tags-owl-box.html
http://whimcees.blogspot.com/2010_10_01_archive.html#1242933453813473200
Saturday, October 23, 2010
Punch Inspiration 10/23/10
http://inkspiredtreasures.com/cards/october-tour-de-freaks-is-here/
http://catsinkcorporated.blogspot.com/2010/09/esad-su-new-catalogue-2010-2011-blog.html
http://sherrysinknstamps.blogspot.com/2010/10/teddy-bear-on-onesie.html
http://www.stampingmoon.com/2010/10/homemade-treat-vintage-dressup.html
http://sarahsinkspot.com/blog/2010/10/festive-friday-meets.html
http://www.splitcoaststampers.com/gallery/photo/1824687?&limit=last1
http://www.splitcoaststampers.com/gallery/photo/1824686?&limit=last1
http://www.splitcoaststampers.com/gallery/photo/1824685?&limit=last1
http://www.splitcoaststampers.com/gallery/photo/1824613?&limit=last1
Friday, October 22, 2010
Punch Inspiration 10/22/10
http://artfriendzy.blogspot.com/2010/09/i-figured-out-how-to-make-some-corn.html
http://stampingcaz.blogspot.com/2010/10/tiny-treats.html
http://stampingcaz.blogspot.com/2010/10/little-step-by-step-petal-punch-photo.html
http://thecraftspa.blogspot.com/2010/10/christmas-sweet-treats.html
http://www.splitcoaststampers.com/gallery/photo/1823872?&limit=last1
http://stampzone.blogspot.com/2010/10/look-whos-turning-70.html
http://stampzone.blogspot.com/2010/09/color-throwdown.html
http://secretlifeofpaper.blogspot.com/2010/10/got-scraps.html
http://stampingwithaimee.blogspot.com/2010/10/christmas-wine-bottle-topper.html
http://istampicreateihavefun.blogspot.com/2010/10/so-sweet-candle-ccmc-hm3.html
http://goinovertheedge.blogspot.com/2010/10/whimsical-penguins-ready-to-party-last.html
Thursday, October 21, 2010
Issues with viewing my blog?
I've a had a handful of reports from readers that have been having problems accessing my blog. It appears that there may be a problem with Firefox and viewing my blog. I have not had any problems with Internet Explorer or Google Chrome on my own computer at home and work. If you are trying to access the site and getting error messages or missing pages, please try out Google Chrome. It's faster and a much safer option for browsing! Thanks
Punch Inspiration 10/21/10
http://stampndesign.blogspot.com/2010/10/halloween-witch.html
http://onehappystamper.typepad.com/stamping_inspirations_wit/2010/10/ho-ho-ho.html
http://paperpleasing.typepad.com/my_weblog/2010/08/anemone-flower-tutorial-yep-free.html
http://a-stamp-a-day.blogspot.com/2010/10/daybook.html
http://www.sandystamper.com/2010/10/my-entry-3.html
http://littlepaperstudio.blogspot.com/2010/10/so-i-couldnt-stop-with-santa.html
http://www.splitcoaststampers.com/gallery/photo/1823159?&limit=last1
http://whimcees.blogspot.com/2010_10_01_archive.html#362820996361282870
http://www.splitcoaststampers.com/gallery/photo/1822957?&limit=last1
Wednesday, October 20, 2010
Top 100 Paper Crafting Blogs - please join!
EDIT: If you have already added your blog to the listing, please log into your account (you can get there easily by clicking on Member Login at the top of the list page) and then click on "get your link code" in the Your Account box. Now, you will notice a photo button in addition to the text only available. Choose the photo button and then click on Generate Code. Then, you can copy and past this code into a widget that you can place anywhere on your blog. Please note that the ranking is based on inbound clicks, so the better placement of the banner on your site, the better for your rankings. It's rather small, so it should fit comfortably anywhere on your site. Please let me know if you have any issues or are unable to get your blog on the listing. Thanks!
Hello all, I thought it would be fun to create a top 100 site for best paper crafting blogs. If you have a stamping, scrapbooking or paper crafting blog, please visit my site and sign up. To prevent spammers or questionable entries, each site has to be approved, so please don't worry if there is a delay in your site showing up.
It is totally free to join my Top Paper Crafting Blogs listing! Please visit my listing here:
http://needmorestamps.gotop100.com/
Enter your information, verify your registration and then be sure to insert the html code into your blog (simply add an html widget). Some time in the near future, I will create a picturelink that you can use for the list link. Until then, the link will show up as just text. Thanks!
Coming soon....
Hi All, just wanted to let you know that I'm almost done with my Holiday 2010 class. I have the punch art done and just need to get them onto a card or other project. Writing up the instructions will take some time as well. Hopefully, I'll be able to get it completed by Sunday. Then, I can get back to posting projects on my blog more often. Thanks for your patience and continuing to visit every day!
Punch Inspiration 10/20/10
http://www.splitcoaststampers.com/gallery/photo/1822581?&limit=last1
http://www.splitcoaststampers.com/gallery/photo/1822536?&limit=last1
http://creationsonpaper.blogspot.com/2010/10/xmas-wishlistplanner-altered-note-pads.html
http://inkpaperstamps.stampincorner.com/2010/10/13/punch-art-tutorial-animal-dog-spaniel-ears/
http://inkpaperstamps.stampincorner.com/2010/10/02/punch-art-idea-dog-adopt-shelter-pet/
http://inkpaperstamps.stampincorner.com/2010/10/04/punch-art-tutorial-face-winsome-witch/
http://inkpaperstamps.stampincorner.com/2010/10/03/tutorial-witch-hat-punch-art/
http://wickedlywonderfulcreations.blogspot.com/2010/10/its-beginning-to-freak-lot-like.html
Tuesday, October 19, 2010
Blog Candy Winner!
Thanks to everyone that left a comment on the Let's Face it Fridays challenge post. There were 44 comments and the winner of the blog candy is #34!
 Congratulations to Jerry who had this to say:


Jerry won the Cottage Cutz Herby die set and the Peachy Keen Cut-Out Faces stamp set! Jerry, please email me at needmorestamps@yahoo.com to claim your prize!
Punch Inspiration 10/19/10
http://www.stampingmoon.com/2010/10/got-treats.html
http://www.stampinpretty.com/2010/10/mojo161-give-a-hoot.html
http://www.splitcoaststampers.com/gallery/photo/1820691?&si=punch%20art
http://flowerbug.typepad.com/my_weblog/punch-art/
http://www.splitcoaststampers.com/gallery/photo/1768389?&si=ornament%20punch
http://www.splitcoaststampers.com/gallery/photo/1745637?&si=ornament%20punch
http://www.splitcoaststampers.com/gallery/photo/1749650?&si=ornament%20punch
http://www.splitcoaststampers.com/gallery/photo/1757130?&si=ornament%20punch
http://www.splitcoaststampers.com/gallery/photo/1757946?&si=ornament%20punch
Monday, October 18, 2010
Punch Inspiration 10/18/10
http://stampsandtaxes.blogspot.com/2010/10/curtain-call-color-challenge-act-52.html
http://inspirestampin.blogspot.com/2010/10/oh-no-she-is-at-it-again.html
http://inspirestampin.blogspot.com/2010/10/heart-petal-punch-idea.html
http://valitasfreshfolds.blogspot.com/2010/10/introducing-my-poinsettia-christmas-set.html
http://www.splitcoaststampers.com/gallery/photo/1821096?&limit=last1
http://www.splitcoaststampers.com/gallery/photo/1821088?&limit=last1
http://papersscissorsrocks.blogspot.com/2010/10/sunday-stamping.html
http://www.splitcoaststampers.com/gallery/photo/1821085?&limit=last1
http://crafthavenretreats.blogspot.com/2010/10/craft-show-recovery.html
http://www.stampingmoon.com/2010/10/pumpkin-roll-recycle.html
http://www.stampingmoon.com/2010/10/wicked-powder-room-halloween-decor.html
http://www.stampingmoon.com/2010/10/wicked-recycled-batty-owl.html
http://www.stampingmoon.com/2010/10/mrs-frankie-goes-to-hollywood.html
http://www.stampingmoon.com/2010/10/wicked-tricked-out-cake-mix.html
Sunday, October 17, 2010
Punch Inspiration 10/17/10
http://www.splitcoaststampers.com/gallery/photo/1820124?&limit=last1
http://www.splitcoaststampers.com/gallery/photo/1820116?&limit=last1
http://stampinuproses.blogspot.com/2010/10/too-cute-cupcakes.html
http://www.sunnygirlscraps.com/2010/10/big-rig-punch-art-card.html
http://www.splitcoaststampers.com/gallery/photo/1820412?&si=punch%20art
http://mrsboz.blogspot.com/2010/10/caseing-darleen-sc299.html
http://www.frenchiestamps.com/2010/10/stamping-411-with-punch-art-snowman.html
http://addinktivedesigns.blogspot.com/2010/10/scallop-circle-easel-card-tutorial.html
http://tammiestamps.blogspot.com/2010/09/halloween-stamp-camp.html
Saturday, October 16, 2010
Punch Inspiration 10/16/10
http://papercraftsloveaffair.blogspot.com/2010/10/royal-blog-tour.html
http://highdesertstamper.com/2010/10/13/christmas-trees-paper-punching-rubberstamping-albuquerque/
http://jguyeby.blogspot.com/2010/10/punch-art-swap-cards.html
http://jackietopa.typepad.com/addicted_to_stamping/2010/10/fireside-christmas.html
http://crafthavenretreats.blogspot.com/2010/10/owl-punch-playdate-desk-set.html
http://www.stampthat.com/blog/dressing-up-my-cardinal-christmas-card/
http://www.splitcoaststampers.com/gallery/photo/1819111?&si=punch
http://traingirl2007.blogspot.com/2010/10/snowman-card-instructions.html
http://www.frenchiestamps.com/2010/10/stampinup-ornament-punch-become-mrs.html
Friday, October 15, 2010
Peachy Keen "Let's Face it Fridays" Challenge #3
The Peachy Keen Let's Face it Fridays Challenge #3 was to create a home decor item in an autumn theme. This challenge was really fun. I recently bought this nice square apothecary candle from Kohls (on sale for $4.99 by the checkout) and I wanted to dress it up. This candle has 4 decorated sides to it. I'm sorry that I didn't have time to write up tutorials for this project, however, I will include the recipe for each side of the candle. Please see the recipe listings at the bottom of this post.
Check out the other great projects by the DT members over at the PKS Challenge site HERE. If you have some Peachy Keen face stamps, you can play along with the challenge to win a Cottage Cutz Pumpkin Trio die set!
Side #1 features this Scare Bear and crows.


Tree & Kid in Leaves:
Peachy Keen Everyday Character Face Assortment (kid face)
Sizzix Bigz XL Pop Up Tree die
3/4" Circle (kid face)
fiskars oval hand punch (ears on kid)
EK Success Leaves border punch
Walk in the Woods designer series paper by Stampin' Up! (tree trunk)
Autumn Spice Designer series papers by Stampin' Up!
pink pirouette, cajun craze, really rust cardstocks
blushing bride ink for sponging kid face, early espresso ink for sponging tree, white gel pen (for eyes)
Pumpkin Trio:
Peachy Keen Cottage Cutz Pumpkin Trio die
pumpkin pie, chocolate chip cardstocks
cajun craze ink for sponging pumpkins
Candle Base:
My Favorite Things grass die
Autumn Spice Designer series papers by Stampin' Up! (olive print)
old olive, certainly celery cardstocks
Make an open top box to set the candle in. Wrap several layers of die cut grass around the outside of the box.
BLOG CANDY DRAWING!
I am excited to offer some great blog candy! PKS recently released several AWESOME Halloween themed Cottage Cutz dies. I am so excited to say that the set called Herby is my design. As a thank you, Kathy sent me some extra Herby Cottage Cutz sets to share with my friends & readers! For a chance to win this die set PLUS the Cut-Out Pumpkin Faces stamp set ($26 Value), all you need to do is add yourself to my followers listing (if you haven't already done so) and leave a comment on this post. I will randomly choose one of the entries on Monday. Check out the other great projects by the DT members over at the PKS Challenge site HERE. If you have some Peachy Keen face stamps, you can play along with the challenge to win a Cottage Cutz Pumpkin Trio die set!
Side #1 features this Scare Bear and crows.

Interested in creating a 100% Stampin' Up! punch scarecrow? Check out my tutorial HERE.
Side #2 features Sunflowers and a silly crow perched on top of the candle.

Side #3 features a beautiful color changing tree with a little kid hiding under a pile of leaves.

Side #4 feature a trio of fall pumpkins.
RECIPES:
(punch names listed are by Stampin' Up!)
Scare Bear:
Large Tag (hat, shirt, pants)
1 3/8" Circle (pants)
Boho Blossoms (large blossom for straw pieces)
2 Step Bird (wing for crows and leaves for beaks)
Autumn Spice Designer series papers by Stampin' Up!
Not quite navy, close to cocoa, creamy caramel, basic black, pumpkin pie cardstocks
chocolate chip ink (for sponging bear), white unibal gel pen (for eyes)
Sunflowers & Crow:
Peachy Keen Everyday Character Face Assortment (flower faces)
Peachy Keen Critter Faces Set A Medium (crow face)
5 Petal Flower (4 layered for the flower)
1 1/4" Circle (flower face)
2 Step Bird (flower petals, wings on crow)
2 Step Owl (crow body, heart beak)
Boho Blossoms (feathers on head, feet)
Word Window (cut in half lengthwise for legs)
Autumn Spice Designer series papers by Stampin' Up!
close to cocoa, basic gray, basic black cardstocks
chocolate chip ink (for sponging flowers), white unibal gel pen (for eyes)
Tree & Kid in Leaves:
Peachy Keen Everyday Character Face Assortment (kid face)
Sizzix Bigz XL Pop Up Tree die
3/4" Circle (kid face)
fiskars oval hand punch (ears on kid)
EK Success Leaves border punch
Walk in the Woods designer series paper by Stampin' Up! (tree trunk)
Autumn Spice Designer series papers by Stampin' Up!
pink pirouette, cajun craze, really rust cardstocks
blushing bride ink for sponging kid face, early espresso ink for sponging tree, white gel pen (for eyes)
Pumpkin Trio:
Peachy Keen Cottage Cutz Pumpkin Trio die
pumpkin pie, chocolate chip cardstocks
cajun craze ink for sponging pumpkins
Candle Base:
My Favorite Things grass die
Autumn Spice Designer series papers by Stampin' Up! (olive print)
old olive, certainly celery cardstocks
Make an open top box to set the candle in. Wrap several layers of die cut grass around the outside of the box.
Punch Inspiration 10/15/10
http://stampingdoc.blogspot.com/2010/10/enjoy-every-moment-october-blog-tour.html
http://www.splitcoaststampers.com/gallery/photo/1817284?&si=punch
http://www.splitcoaststampers.com/gallery/photo/1817262?&si=punch
http://www.splitcoaststampers.com/gallery/photo/1817251?&si=punch
http://stampercamper.com/cardpost/classic_stars
http://debzhouse.blogspot.com/2010/10/rudolf-reindeer-punch-art.html
http://up2myears.blogspot.com/2010/10/christmas-planner.html
http://addinkandstamp.blogspot.com/2010/10/owl-treat-container.html
http://www.carlas-scraps.com/2010/10/pals-paper-arts-challenge-and-sunflower.html
Thursday, October 14, 2010
Punch Inspiration 10/14/10
Here is a cool new flower technique. Check it out.
http://inspirestampin.blogspot.com/2010/10/rose-using-petal-card-punch-and-another.html
I was in a little cardinal mood today. Enjoy!
http://www.splitcoaststampers.com/gallery/photo/1803845
http://www.splitcoaststampers.com/gallery/photo/1813988?&si=bird%20punch
http://www.splitcoaststampers.com/gallery/photo/1809283?&si=bird%20punch
http://www.splitcoaststampers.com/gallery/photo/1762337?&si=cardinal%20punch
http://www.splitcoaststampers.com/gallery/photo/1568362?&si=cardinal%20punch
http://www.splitcoaststampers.com/gallery/photo/1548517?&si=cardinal%20punch
http://stampndesign.blogspot.com/2009/11/kissing-cardinals.html
http://www.splitcoaststampers.com/gallery/photo/1536649?&si=cardinal%20punch
Wednesday, October 13, 2010
Punch Inspiration 10/13/10
http://hlkdownstairsdesigns.blogspot.com/2010/10/scs-color-challenge.html
http://istampedthat.com/2010/10/12/owl-be-home-for-christmas/
http://stampingbysam.blogspot.com/2010/10/owl-be-seeing-who-who-who.html
http://www.splitcoaststampers.com/gallery/photo/1812834?&si=owl%20punch
http://www.splitcoaststampers.com/gallery/photo/1810907?&si=owl%20punch
http://www.splitcoaststampers.com/gallery/photo/1810596?&si=owl%20punch
http://www.splitcoaststampers.com/gallery/photo/1810522?&si=owl%20punch
http://www.splitcoaststampers.com/gallery/photo/1810515?&si=owl%20punch
http://stampingaddict.blogspot.com/2010/10/im-dreaming-of-ayelloworangewhite.html
http://www.splitcoaststampers.com/gallery/photo/1806606?&si=owl%20punch
http://didyoustamptoday.blogspot.com/2010/09/happy-birthday-owl.html
I just can't get enough of this Stampin' Up! 2 Step Owl punch!
Tuesday, October 12, 2010
Craft Gossip
Hello everyone, if you haven't checked out the Craft Gossip blog site, it's totally worth the time! I've had a few of my tutorials featured on the site. Check it out!
http://stamping.craftgossip.com/project-stage-card/2010/10/06/
http://stamping.craftgossip.com/tutorial-sliding-pop-up-card/2010/09/07/
http://stamping.craftgossip.com/project-tutorial-t-slider-card/2010/09/17/
http://stamping.craftgossip.com/project-stage-card/2010/10/06/
http://stamping.craftgossip.com/tutorial-sliding-pop-up-card/2010/09/07/
http://stamping.craftgossip.com/project-tutorial-t-slider-card/2010/09/17/
LFIF Challenge #2 Reminder
Hello all, if you haven't checked it out yet, you can still enter the Let's Face It Fridays PKS Challenge #2. Angelica will be announcing the winner on Friday morning when challenge #3 goes live. If you have any Peachy Keen Face stamps and would like to play along, please visit the challenge post:
http://peachykeenstampschallenge.blogspot.com/2010/10/peachy-keen-stamps-lets-face-it-friday.html
There is a fabulous prize for the winner of the challenge! There aren't a lot of entries yet, so you have a good chance of winning! The design team members (myself included) along with Kathy & Angelica will decide the winner. Come on, show me what you've got!
Punch Inspiration 10/12/10
http://www.splitcoaststampers.com/gallery/photo/1814279?&cat=14545
http://blinkthinkink.blogspot.com/2010/10/easy-shark.html
http://megacraftycreations.blogspot.com/2010/10/christmas-is-coming.html
http://www.splitcoaststampers.com/gallery/photo/1815770?&limit=last1
http://glendamollet.blogspot.com/2010/10/stampin-up-bat-punch-scallop-edge.html
http://blinkthinkink.blogspot.com/2010/10/easy-shark.html
http://megacraftycreations.blogspot.com/2010/10/christmas-is-coming.html
http://www.splitcoaststampers.com/gallery/photo/1815770?&limit=last1
http://glendamollet.blogspot.com/2010/10/stampin-up-bat-punch-scallop-edge.html
Monday, October 11, 2010
Punch Addiction 10/11/10
I found another great site with lots of wonderful punch art ideas:
http://istampicreateihavefun.blogspot.com/2010/10/owl-wishes-cqc53.html
http://istampicreateihavefun.blogspot.com/2010/09/happy-bee-day-scic22.html
http://istampicreateihavefun.blogspot.com/2010/09/paisley-turkey-blog-candy.html
http://istampicreateihavefun.blogspot.com/2010/09/mischievous-monkey-cqc49.html
http://istampicreateihavefun.blogspot.com/2010/08/vintage-tulips-scic16.html
http://istampicreateihavefun.blogspot.com/2010/09/pirate-pelican-scic18.html
http://istampicreateihavefun.blogspot.com/2010/07/bride-and-groom-owl-in-love-nest.html
http://istampicreateihavefun.blogspot.com/2010/07/summer-scene-cqc40-and-ccmc106.html
http://istampicreateihavefun.blogspot.com/2010/07/birthday-candles-ccccact37.html
http://istampicreateihavefun.blogspot.com/2010/07/summer-paper-picnic-scic09.html
http://istampicreateihavefun.blogspot.com/2010/05/happy-strawberry-scic04.html
http://istampicreateihavefun.blogspot.com/2010/03/shes-ready-for-easter-ccccact19.html
Sunday, October 10, 2010
Punch Inspiration 10/10/10
Hello Everyone, sorry my punch inspiration is late today. I didn't have time to surf yesterday and get my post ready for 8 am. Here are some great ideas from the net.
Saturday, October 9, 2010
Punch Inspiration 10/9/10
http://jessandkarenspapercraft.wordpress.com/2010/10/07/mr-and-mrs-claus/
This isn't punch art, but it is a super cool technique! I'm going to make one of these shortly.
http://sweeetdesignsbycheryl.blogspot.com/2010/08/rrr-challenge6-aloha-funky-fold-video.html
Awesome punch ideas:
http://callalilystudio.wordpress.com/2010/09/30/noahs-ark-2/img_5340/
http://inkspiredtreasures.com/cards/pumpkin-punch-art-create-with-connie-and-mary-thursday-challenge/
http://whimcees.blogspot.com/2010_10_01_archive.html#5509415688157744945
http://www.splitcoaststampers.com/gallery/photo/1813618?&cat=14545
http://www.splitcoaststampers.com/gallery/photo/1813651?&limit=last1
http://www.splitcoaststampers.com/gallery/photo/1813581?&limit=last1
http://www.stampinghut.com/2010/10/tuesday-night-card-class-oct-12-at-700.html
Friday, October 8, 2010
Punch Inspiration 10/8/10
http://ryemilan.blogspot.com/2010/10/draco-diligent-dungeon-dragon.html
http://blinkthinkink.blogspot.com/2010/10/owl-pizza.html
http://ryemilan.blogspot.com/2010/10/draco-diligent-dungeon-dragon.html
http://bonniescreativeplace.blogspot.com/2010/10/fall-thanksgiving-tutorial.html
I just found this site. So many great ideas!
http://mafercreations.blogspot.com/search/label/PUNCH%20ART
Here website is in spanish. If you visit the site using Google Chrome as your browser, there will be a button at the top for a Google translator so you can change the language to english on the site.
Thursday, October 7, 2010
Punch Inspiration 10/7/10
http://bethapalooza.blogspot.com/2010/10/justrite-challenge-038.html
http://stampndesign.blogspot.com/2010/10/laced-luminaria.html
http://stampndesign.blogspot.com/2010/05/tanning-bikini-beach-babe.html
http://flowerbug.typepad.com/my_weblog/2010/10/pal-the-puppy-for-punch-art.html
http://www.splitcoaststampers.com/gallery/photo/1811807?&cat=14545
http://www.splitcoaststampers.com/gallery/photo/1812145?&limit=last1
http://www.stampwithlindawalsh.com/9/post/2010/10/second-treat-box.html
http://www.splitcoaststampers.com/gallery/photo/1811877?&limit=last1
http://juliesstampjournal.blogspot.com/2010/10/my-swap-for-baltimore-regional.html
Wednesday, October 6, 2010
Punch Inspiration 10/6/10
http://jackietopa.typepad.com/addicted_to_stamping/2010/10/scrubs-lollypops.html
http://krisisstampin.blogspot.com/2010/10/swaps-for-regionals-in-baltimore.html
http://stampzone.blogspot.com/2010/10/holiday-open-house.html
http://pinkbuckaroodesigns.blogspot.com/2010/10/cqc-52-sweet-christmas.html
http://pinkbuckaroodesigns.blogspot.com/2010/09/stampin-celebration-and-blog-candy.html
http://pinkbuckaroodesigns.blogspot.com/2010/08/crayon-box-thank-you.html
http://pinkbuckaroodesigns.blogspot.com/2010/08/punch-art.html
http://pinkbuckaroodesigns.blogspot.com/2010/10/hapy-birthday-little-firefighter.html
Tuesday, October 5, 2010
Punch Inspiration 10/5/10
http://stampininspirations.blogspot.com/2010/10/my-scrap-chick-halloween-treat-box.html
http://melanieschulenberg.blogspot.com/2010/10/frank-n-stein-character-box.html
http://weekendstamper.blogspot.com/2010/10/more-spidey-treats.html
http://rosdavidson.typepad.com/ros_davidson_live_life_an/2010/09/mmm-30.html
http://rosdavidson.typepad.com/ros_davidson_live_life_an/2010/05/making-merry-monday-18.html
http://rosdavidson.typepad.com/ros_davidson_live_life_an/2010/05/making-merry-monday-16.html
http://rosdavidson.typepad.com/ros_davidson_live_life_an/2010/05/making-merry-monday-17.html
http://rosdavidson.typepad.com/ros_davidson_live_life_an/2010/05/making-merry-monday-15.html
http://rosdavidson.typepad.com/ros_davidson_live_life_an/2010/04/autumnwinter-mini-catalogue-creations-day-5-and-making-merry-monday.html
Monday, October 4, 2010
PKS Blog Hop Prize Drawing
I had 325 comments on the PKS September Blog hop! I jumped over to Random.or and the big winner is
137
Congratulations to Angela (Simple Creations)! She won the PKS Snow Cuties stamp set.
Please email me at needmorestamps@yahoo.com to give me your mailing address.
Awesome Techniques
Today, I want to share some awesome techniques I've stumbled upon as I surfed the net for punch art inspiration. All of these techniques are worth trying out!
http://www.stampinpretty.com/2010/09/ppa62-button-button.html
http://www.stampinpretty.com/no-slide-ribbon-video-tutorial.html
http://inspirestampin.blogspot.com/2010/06/double-drawer-easel-tutorial.html
http://inspirestampin.blogspot.com/2010/04/easel-card-with-drawer-tutorial.html
http://inspirestampin.blogspot.com/2009/03/tutorial-for-little-tote-bag.htm
http://addinktivedesigns.blogspot.com/2010/10/scallop-circle-easel-card-tutorial.html
Punch Inspiration 10/4/10
http://ryemilan.blogspot.com/2010/10/buggy-birthday-for-boy.html
http://ryemilan.blogspot.com/2010/10/puppy-party-punchie.html
http://stampndesign.blogspot.com/2010/10/hello-kitty-christmas.html
http://stampndesign.blogspot.com/2010/09/hello-kitty-punch-art.html
http://jackietopa.typepad.com/addicted_to_stamping/2010/09/waffle-paper-pilgrim-hat.html
http://jackietopa.typepad.com/addicted_to_stamping/2010/09/punch-art-campfire.html
http://lisalovesstampinandscrapin.blogspot.com/2010/09/santa-box.html
Sunday, October 3, 2010
Punch Inspiration 10/3/10
http://addinktivedesigns.blogspot.com/2010/10/candy-cane-inspiration.html
http://addinktivedesigns.blogspot.com/2010/10/woodland-walk-owl-post-it-note-holder.html
http://flowerbug.typepad.com/my_weblog/2008/12/punch-art-wednesday.html
http://www.stampinpretty.com/2010/10/simple-saturday-autumn-spice-is-nice.html
http://paperfairykris.blogspot.com/2010/09/trick-or-treating-owls.html
http://melissahuie.blogspot.com/2010/09/friend-to-friend-silhouette-card.html
http://www.splitcoaststampers.com/gallery/photo/1806684?&cat=14545
Saturday, October 2, 2010
Jointed Build-a-Bear Tutorial
Hi all, I had referred to my jointed build a bear on my snow angel page. I forgot that this tutorial was on my Build-a-Bear class which includes several outfits for your bear. I thought I would share this tutorial with you all since it's so much fun. If you want to dress your jointed bear, check out my 2 bear classes:
Bear for all Seasons
Build a Bear
The outfits for these 2 classes are interchangeable. If you don't have the Sizzix Build-a-Bear die, there are step by step instructions for making a punch art bear in the Bear for all Seasons class. I also added a panda bear tutorial HERE (note: this bear is a little different from my bear in the Bear for all Seasons class).

Punches Needed:
Cocoa


Bear for all Seasons
Build a Bear
The outfits for these 2 classes are interchangeable. If you don't have the Sizzix Build-a-Bear die, there are step by step instructions for making a punch art bear in the Bear for all Seasons class. I also added a panda bear tutorial HERE (note: this bear is a little different from my bear in the Bear for all Seasons class).

Punches Needed:
Build-a-Bear Sizzix Die – 2 in close to cocoa
1 3/4" Circle (112004) in cocoa – BELLY
1 3/8” Circle (104401) in cocoa – HEAD
3/4" Circle (107217) in cocoa – EARS & JOINTS
1/2" Circle (104390) in caramel – EARS
1/2" Circle (104390) in cocoa – JOINTS
Small Oval (107304) in caramel – MUZZLE
Heart to Heart (113694) small heart in black – NOSE
Teardrop for eyes (may use Boho Blossoms cut apart for eyes)
Supplies Needed:
Adhesive (liquid monoadhesive is best)
Dimensionals
4 mini brads (any color will work)
Uni-bal white gel ink pen
Zig detail black pen
Paper piercing tool & mat
Instructions:
Die cut 2 build a bears. One will be used for the body/head and the other one will be used for the arms & legs. Cut the arms and legs off of one bear so that only the head and torso remain. Cut the arms and legs off the other bear as shown. Sponge all of the pieces with cocoa ink.

Glue the caramel circles onto the cocoa circles to make ears. Glue ears onto head (lined up with outer edge of ear on die cut). Attach head onto body with dimensional. Glue heart onto muzzle and clip away top of heart. Attach muzzle with dimensional. Glue on teardrop eyes and add detailing to face.
Glue a 1/2" circle onto the end of each arm to create a shoulder. Glue a 3/4" circle onto the end of each leg to create a leg joint.

Punch a hole in the center of the joint pieces on the end of each arm and leg as shown. Punch holes into body and attach arms and legs with mini brads as shown.
Put one dimensional in the center of the belly piece and attach to the body. Use only one, or the joints will hit the dimensionals and not be free moving.
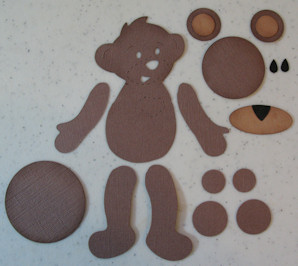
Fuzzy Tear Bear Instructional


Hello everyone, are you ready to create a fuzzy bear? This looks so hard but its really very easy. To make this bear, the most important thing you will need is a high quality extra thick mulberry paper. I've tried every paper on the market and the papers available at The Beary Scrap are the absolute best! If you are serious about creating tear bears, this is where you need to buy your paper.
You will need template pieces to create your tear bear. To make the template pieces, punch the following Stampin' Up! punches out of white tagboard:
Ornament - Head
1 3/4" Circle - Body
Modern Label - Arms & Legs
Wide Heart (cut in half with rounded edges) - Feet
Medium Oval - Muzzle
Medium Oval (or 3/4" Circle) - Ears
1/2" Circle - Inner Ears
1 3/8" Circle - Belly
Small Oval - Feet Pads
I used chocolate and mocha colored mulberry papers for this bear.
Basic Tear Bear Instructions:
Place your template piece onto the rough side of the mulberry paper. Using an aqua painter or watercolor brush, trace around the outside edge of the template. You don't need to soak the paper, but you should put enough water down that the fibers will tear easily.
Now, tear your piece out by hand. If you pull the piece towards you as you tear, you will get more of a feathery fluffy edge. Complete these steps for all pieces. If you want to make the edges even more feathery, you can use a toothbrush to lightly brush the outside edges of the pieces. Let the pieces dry thoroughly. If you didn't put a lot of water on them, they should dry within a few minutes.


After the pieces are dry, you can add the details. For the face, I stamped the PKS Tear Bear Face Parts. First stamp the eyes on the head with black and add white highlights with a unibal gel pen. Stamp the nose on the muzzle. If you want to add some more definition to the pieces, you can brush the edges with a creamy chalk or pigment ink.
Mount the muzzle onto the face with a dimensional. Glue the tummy piece onto the body. Glue the feet pads onto the feet. Attach the feet to the legs with dimensionals. Attach legs onto back of body with dimensionals. Attach arms to back of body with dimensionals. Glue ear centers onto ears. Glue ears onto back of head.
At this point, you can add a little more fluff to your bear. Lightly brush the surface of your bear with an aqua painter (don't put water near the eyes or nose). Then, carefully pull the top fibers up with a needle. Don't pull too hard, or they will come right off! Then let it dry. Once dry, the bear will look nice and fluffy.
Want some more information and direction? Beary Scrap has some great tips and instructions HERE.
Subscribe to:
Posts (Atom)