Oh the joy of punch art!
http://www.stampinchic.com/2010/06/eyelet-flower-tutorial-and-ppa-card.html
http://www.nightowlstamper.com/2010/06/fabulous-flowers.html
http://andreawalford.com/?p=4566
http://inkspiredtreasures.com/cards/create-with-connie-and-mary-fathers-day-challenge/
http://stampinat6213.blogspot.com/2010/03/caseing-punch-art.html
http://paperpleasing.typepad.com/my_weblog/2010/06/flower-power-for-teacher-.html
http://www.stampinpretty.com/2010/06/mojo-monday-145.html
http://home-and-garden.webshots.com/photo/2069446280047996982ZpCNoq
http://www.nightowlstamper.com/search/label/Ornament%20Punch
http://dostamping.typepad.com/dostamping_with_dawn/2009/07/getting-punchy-summer-camp-cheerleader-from-stampin-up-punches.ht
Did I mention I love punches?
Saturday, July 3, 2010
Friday, July 2, 2010
Sliding Pop Up Card Tutorial
Hello everyone! my newest technique is here. This technique will be featured on Technique Wednesday on Split Coast Stampers in January 2011. It looks complicated but is very easy to make.


Instructions:
1) Score the following pieces as follows:


Pumpkin Patch
Happy Lashes Snowman
Raggedy Andy
Easter Bunny
Forest Festivities
Please see the video tutorial HERE.


Cardstock Pieces Needed:
5 1/2" x 4 1/4" card base (marina mist)
5 3/8" x 4" pop up back piece (bashful blue)
1 1/2" x 9" sliding wrap (pear pizazz)
1 1/2" x 2 1/2" pop up piece (bashful blue)
1" x 2 3/4" card back prop piece (marina mist)
1/2" x 1 1/2" pop up prop piece (bashful blue)
round tab punch (or substitute) for the pull tab (marina mist)
You need to use a sturdy cardstock for these pieces. I used Stampin' Up! cardstocks. The pear and bashful blue is their textured and the marina mist is the smooth finish. For the wrap piece (pear), you could use a piece of designer series paper or a thinner paper since this doesn't have to support weight on any of the pieces.
Instructions:
1) Score the following pieces as follows:
- 5 3/8" x 4" - score at 1 1/2"
- 1 1/2" x 9" - score at 2" & 6 1/4"
- 1 1/2" x 2 1/2" - score at 1/2"
- 1" x 2 3/4" - score at 1/2" on each end
- 1 1/2" x 1/2" - score at 1/2" on each end

2) Put strong adhesive on the pop up piece, pop up prop piece and card back prop piece. I recommend sticky strip or scor tape. Put the adhesive next to the score line. For the 1" x 2 3/4" piece, the tape goes on one end, flip over to the wrong side and put tape on the other end.

3) Put adhesive on the pop up back piece as shown. One line of tape along the score line and the other along the bottom. Adhere the wrap piece with the bottom edges of the pieces lined up. There will be about 1/8" from each edge of the bashful blue piece to the score lines on the wrap.

4) Tape on the pop up piece centered at the score line as shown.

5) Adhere the pop up prop piece centered on the score line of the pop up piece as shown.

Fold the pop up prop piece to the right as shown and peel the backing off the sticky strip.

Carefully hold this little piece in place. Grab the pop up back to the right and fold over and press down to adhere to the little prop piece.

When you open it back up, it should look like this:


6) Push the pieces flat and then flip it over. Tape the wrap in place. Make sure that it is not adhered to the back of the bashful blue piece. It needs to be free sliding.


7) Flip the card back over. Grab the pop up back piece and fold over to the left to allow access to the back of it. Tape the back prop piece centered with the score line on one end about 1" from the edge of the card base piece as shown.

Take the backing off the tape on the other end of the prop. Make sure that the sliding wrap piece is lined up at the bottom edge of your card base piece (marina mist) and then flatten the pop up back piece back down on top of the prop piece as shown.

Now, when you slide the green wrap piece to the right, the back of the card will automatically pop up as shown below.

This view is the front of the card in the open position. Attach the pull tab on the bottom of the card base and write "pull" on it.

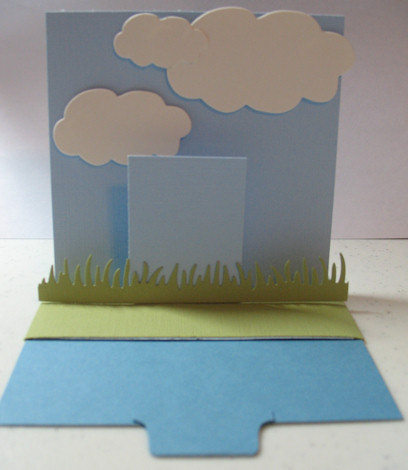
8) Decorate your card as desired. For my card, I used a MFT clouds die to cut some clouds out of shimmery white cardstock and attached them with dimensionals. Then I used an MFT grass die to cut 2 strips of grass. I attached the bottom edge of one piece to the pop up piece as shown. Then, I attached my tree to the bottom of the pop up piece and then attached another strip of grass over the top of that. The wonderful tree and owls are from the Sheltering Tree stamp set by My Favorite Things.
I stamped 2 greetings. One on the card base that will show up when the card is open and one on the sliding wrap piece that shows when the card is closed/open. If you wanted to, you could wrap a ribbon or even add other embellishments to the front of the wrap piece.
I hope you all have as much fun making a sliding pop up card as I did!!!! Looking forward to seeing your creations. If you make a card, please post a link here in the comments. Also, please post a link on your blog or SCS gallery to my site for the step by step instructions. THANKS!
HERE ARE MORE SLIDING POP UP CARD IDEAS!!
Happy Lashes Snowman
Raggedy Andy
Easter Bunny
Forest Festivities
Punch Inspiration 7/2/10
I'm going to enjoy my long weekend. I hope you all have wonderful plans for the Independence Day Weekend (my US readers)! If you are one of my non US readers, have a wonderful sun filled summer weekend!
http://andreawalford.com/?p=2751
http://itsastampthing-vicki.blogspot.com/2010/06/sssc75enjoy-journey.html
http://myhappyplace.typepad.com/my_happy_place/2010/06/shrimp-punch-art.html
http://www.splitcoaststampers.com/gallery/photo/1738674?&limit=last1
http://colleen-dietrichdesigns.blogspot.com/2010/06/bird-in-nest.html
http://colleen-dietrichdesigns.blogspot.com/2010/06/punchy-cocoa-gardens.html
http://www.splitcoaststampers.com/gallery/photo/1738221?&limit=last1
http://andrealowcock.wordpress.com/2009/03/20/punch-art-baby-carriage/
http://artisticavenger.wordpress.com/2010/06/22/fantastic-fathers-day/
http://artisticavenger.wordpress.com/2010/06/15/not-so-bitty-buttons/
http://mystamphabit.blogspot.com/2010/05/for-mario-bros-fan.html
http://myhappyplace.typepad.com/my_happy_place/2009/12/video-game-punch-art.html
Enjoy!
Thursday, July 1, 2010
Punch Inspiration 7/1/10
Good morning everyone. Hope you are all having a wonderful crafty week! More great ideas for you:
http://paperpleasing.typepad.com/my_weblog/2010/04/flowers-in-pictures-tutorial-.html
http://obsessedwithstamping.blogspot.com/2010/06/strawberry-shortcake.html
http://craftingamongfriends.blogspot.com/2010/06/punch-of-baby.html
http://www.splitcoaststampers.com/gallery/photo/1737837?&limit=last7&perpage=96&thumbsonly=0
http://jackietopa.typepad.com/addicted_to_stamping/2010/06/retired.html
http://stamptopia.com/i-love-me-a-good-punch
http://inkingthenightaway.blogspot.com/2010/03/punch-art-swap-3.html
http://inkingthenightaway.blogspot.com/2010/03/punch-art-swap-2.html
http://blinkthinkink.blogspot.com/2010/06/while-we-are-on-60s.html
http://www.splitcoaststampers.com/gallery/photo/1738887?&limit=last1
http://itsastampthing-vicki.blogspot.com/2010/06/americana-bluebirds.html
Happy punching!
Wednesday, June 30, 2010
Punch Inspiration 6/30/10
Good morning everyone! I've got some real goodies for you today!
http://prairiepaperie.blogspot.com/2010/06/punch-art-rescue.html
http://dostamping.typepad.com/dostamping_with_dawn/2010/06/last-chance-stamps-99-kit-dusty-durango-sample.html
http://blinkthinkink.blogspot.com/2010/05/friend-to-friend-duck.html
http://hopepackages.blogspot.com/2010/04/robot-family-punch-art.html
http://artisticavenger.wordpress.com/2010/04/04/a-bright-little-birdie/
http://www.splitcoaststampers.com/gallery/photo/1638108?&si=ariel%20punch%20art
http://stampingnut.blogspot.com/2010/06/happy-tuesday-here-is-another-card-i.html
3-D project:
This one isn't punch related, but it's so awesome I just had to share!
http://hopepackages.blogspot.com/2010/06/paper-strawberries-in-handmade-basket.html
http://hopepackages.blogspot.com/2010/04/bug-punch-art.html
http://prairiepaperie.blogspot.com/2010/06/watermelon-punch.html
Tuesday, June 29, 2010
coming soon
Hey all, I'm working on a new interactive card design. I'm hoping to have it posted within the next couple days.
Incidentally, my T-Slide card has been moved up in the SCS Spotlight Technique from January 2011 to next month! Watch for a super cute and awesome punch art card to appear on the homepage of SCS on July 21st!
I hope you all are enjoying the punch art finds of the day!
Incidentally, my T-Slide card has been moved up in the SCS Spotlight Technique from January 2011 to next month! Watch for a super cute and awesome punch art card to appear on the homepage of SCS on July 21st!
I hope you all are enjoying the punch art finds of the day!
Punch Inspiration 6-29-10
Good morning all of you in punch land! Enjoy some punchin' love.
http://blinkthinkink.blogspot.com/2010/04/panting-with-excitement.html
http://prairiepaperie.blogspot.com/2010/06/barbecue-punch-art-with-faux-cloud.html
http://myhappyplace.typepad.com/my_happy_place/2009/12/video-game-punch-art.html
http://bethapalooza.blogspot.com/2010/06/have-sweet-4th-of-july-from-uncle-sam.html
http://inspirationink.typepad.com/inspiration-ink/2010/06/stem-sayings-samples.html
http://blinkthinkink.blogspot.com/2010/06/back-to-dancing.html
http://www.splitcoaststampers.com/gallery/photo/1728336?&si=punch%20art
http://papercraftsloveaffair.blogspot.com/2010/05/scrapbook-in-box.html
http://stampndesign.blogspot.com/2010/06/punched-paper-lilies.html
http://artisticavenger.wordpress.com/2010/05/19/to-the-moon/
Fun 3-D Project
http://artisticavenger.wordpress.com/2010/06/04/special-delivery/
Tips & Tricks
http://artisticavenger.wordpress.com/2010/05/29/welcome-baby/
Monday, June 28, 2010
Punch Inspiration 6-28-10
I hope you all got to surf the net over the weekend and discover some more awesome punch art! Here are some goodies I dug up.
http://inkyrat.typepad.com/inkyrat_creates/2009/01/punch-along-with-me-birds-brains.html
http://mercedesweber.blogspot.com/2009/01/punch-art-book-pg-2.html
http://myhappyplace.typepad.com/my_happy_place/2009/11/recipe-card-club.html
http://rachelcapps.wordpress.com/2010/03/14/batman-belt-punch-art/
http://prairiepaperie.blogspot.com/2009/09/i-heart-paper-punch-art.html
http://imstampinsilly.blogspot.com/2009/07/blushing-bride.html
http://beedevinedesigns.blogspot.com/2010/05/for-shower.html
http://theminkymooseclub.blogspot.com/2010/02/punch-art-sneak-peak.html
http://scrapingandstamping.blogspot.com/2010/02/tinkerbell-punch-art.html
http://sharonc-stampingwithsharon.blogspot.com/2009/06/picnic-punch-art-class.html
http://stampinking.blogspot.com/2010/06/girly-monkey.html
http://creativewishes.blogspot.com/
Enjoy!
Sunday, June 27, 2010
Punch Inspiration 6-27-10
Good morning everyone! I hope you have some time to check out these great punch art finds of the day!
http://rachelcapps.wordpress.com/2010/03/13/skater-16th-birthday/
http://valitasfreshfolds.blogspot.com/2010/02/little-baby-punchart-birds-video.html
http://melanystamps.typepad.com/let_me_stamp/2009/10/i-won-i-won-and-other-news.html
http://myhappyplace.typepad.com/my_happy_place/punch-art/
http://rosemariediehl.blogspot.com/2009/04/freebie-friday-13.html
http://mercedesweber.blogspot.com/2010/01/love-you-stinky.html
http://rynscraps.blogspot.com/2009/10/classic-alien-punch-art.html
http://inkyrat.typepad.com/inkyrat_creates/2009/02/punch-along-with-me-raining-dogs-and-cats.html
http://creationsbycorie.blogspot.com/2010/02/puffy-flower-tutorial.html
Not punch related but probably the most clever kids treat thing I have ever seen!
http://stampwithheather.typepad.com/stamp_with_heather/2010/06/cupcake-recipe.html
Enjoy!
Saturday, June 26, 2010
Punch Inspiration 6-26-10
Well, I've figured out the wonders of scheduling your blog posts ahead of time. This way, I can set up a post when I have a bunch of links and it will appear in the future when I tell it to. Using this feature, I may be able to keep up with a daily post after all!
Here are today's punch inspirations!
http://valitasfreshfolds.blogspot.com/2010/04/baby-jumpsuit-punch-art-box-set.html
http://stampspaperscissors.typepad.com/stamps_paper_scissors/2010/01/how-to-wish-a-ninja-happy-birthday.html
http://creationsonpaper.blogspot.com/2010/02/goofy-candy-blog-winner.html
http://bonniescreativeplace.blogspot.com/2010/01/stampin-up-punch-art.html
http://rachelcapps.wordpress.com/2010/05/13/the-inklings-teams-first-ever-blog-hop/
http://marielovestostamp.blogspot.com/2010/06/hula-girl-punch-art.html
http://melanystamps.typepad.com/let_me_stamp/punch-art/
http://glittergirljani.wordpress.com/2009/09/24/halloween-treats/dsc08180/
Enjoy!
Friday, June 25, 2010
Punch Inspiration 6-25-10
Hello everyone, I hoped you liked the first days punch art finds of the day. I can't guarantee that there will be a "finds of the day" posting every day of the week, but I will try and post several times a week.
Yesterday, I had some people report that they couldn't access a link or 2 in the listing of finds because you had to be "subscribed" to the website. I honestly don't know how I got access to these links in the first place since I'm not subscribed to them. They were all results of searches online.
Here is some more inspiration:
http://ryemilan.blogspot.com/2010/02/some-rainy-day-dinosaur-punch-art.html
http://www.pennyscreativecorner.com/2009/09/peppermint-patty-monsters.html
http://www.pennyscreativecorner.com/2009/08/punch-art-uncle-sam.html
http://www.splitcoaststampers.com/gallery/photo/1735128?&si=punch%20art
http://valitasfreshfolds.blogspot.com/search/label/punches
http://stampndesignstore.blogspot.com/2010/06/mr-mrs-potato-head-cards-or-game.html
http://wheremmsgather.blogspot.com/2010/06/punchin-cute-tree.html
http://www.mariestamps.com/2010/06/celebrate-with-splits.html
http://www.seasonsofstamping.com/2010/06/happy-25th-anniversary.html
http://blinkthinkink.blogspot.com/2010/06/wino-kitty-how-to.html
Enjoy!
Thursday, June 24, 2010
Punch Inspiration 6-24-10
Hey all, I am a regular reader of Blog Finds of the Day. Kelly always manages to find some true gems out there on the internet. Her finds include cards, scrapbook pages and 3-d items featuring Stampin' Up! stamps and products.
Along those lines, I thought it would be fun to offer a Punch Art Finds of the Day since all of my readers and followers are very interested in that medium.
So without further ado, here are my Punch Art Finds of the Day.
Card Inspiration:
http://ryemilan.blogspot.com/2010/02/meet-mad-monkey-monster.html
http://stampwithjane.com/2010/05/14/little-chef-punched-art-scrapbook-page/
http://www.stamperdog.com/2010/06/12-stampin-up-retirement-list.html
http://www.carlas-scraps.com/search/label/Punch%20Art
http://www.pennyscreativecorner.com/punch-art/
http://www.stampandscrapwithkim.com/punch-art/
http://stampinwithjacque.com/graduation-picture-frame-punch-art-page
Tips & Tricks:
http://www.angelasargeant.com/blog/stampin-up/punching-a-bracket-using-the-stampin-up-tab-punch/
3-D Fun:
http://www.sassystampchick.com/stamping_with_the_sassy_s/2009/07/punch-art.html
http://www.mychicnscratch.com/2009/05/animal-punches.html
Enjoy!
Wednesday, June 23, 2010
Punch Art Blog Hop
Hello everyone! check out the punch art projects featured at these blogs in today's blog hop! The blog hop list is located below the instructions for my card.

My card for the blog hop is my "Sick as a Dog" card.

You need the following Stampin' Up! punches to make this little doggie. I used a non SU color cardstock but I recommend creamy caramel or close to cocoa cardstock.
1 3/8" Circle for head
Wide Oval for body
3/4" Circle for the paws (trim away 1/4 of the bottom and round out edges)
Modern Label for legs and feet (cut one label in half and round one edge of each piece for the haunches, punch out 2 labels and cut 1/3 off of each label and round out edges for each foot)
small heart from Heart to Heart for the foot pads (use a marker or watercolor wonder to color the toe pads)
3/4" Circle for the tail (cut off 1/3 of the circle at a slight curve)
1" Circle for muzzle
1/2" Circle cut in half for the eyelids, 1 punched out of black and trimmed into an oval for the nose
3/8" Circle from the Punch Pack for the eyeballs, 2 teardrop punches in black for eyes
for ears, punch half of the 3/4" circle, then line up the 1" circle over the top of punched hole to create ear
3/8" circle for the thermometer (cut a thin white strip for the rest of the thermometer)
1 1/4" square punch in white for the tissue (mist with water and crumple up)
Pillow is made by cutting a rectangle 2 3/4" x 1 3/4". Punch 2 Large Ovals and glue onto each end and trim away sharp corners. Punch 4 small hearts from Heart to Heart and glue onto each corner of pillow.
All caramel pieces are sponged with caramel ink. Spots are made with a sponge dauber and ink. Muzzle, paws, nose and feet are mounted with dimensionals.
Tuesday, June 22, 2010
Blog Hop this Wednesday!
Hello everyone, I'm excited to announce that my first blog hop will be this Wednesday. I have 10 other wonderful ladies participating in the hop. We are all sharing punch art created with Stampin' Up! punches. I already got my card done and I'm sure you will all love it!
Incidentally, my guest spot on Split Coast Stampers has been moved up to July! I'm excited to be teaching the T-Slide card. I've got a couple more cool interactive cards in design as we speak. They will be coming in the near future. Sorry I haven't posted any new punch art in a few days. I picked up some nasty bug and have just been too sick and tired to do much of anything. Thanks everyone for being loyal readers.
Incidentally, my guest spot on Split Coast Stampers has been moved up to July! I'm excited to be teaching the T-Slide card. I've got a couple more cool interactive cards in design as we speak. They will be coming in the near future. Sorry I haven't posted any new punch art in a few days. I picked up some nasty bug and have just been too sick and tired to do much of anything. Thanks everyone for being loyal readers.
Thursday, June 17, 2010
Paper Punch blog hop?
Hello everyone, I would like to organize a blog hop for creations made with Stampin' Up! paper punches for June 23rd. If you would like to participate, please email me at needmorestamps@yahoo.com with your website address. I will compile the list of participants (with links) to include in your post on that day. Thanks!
Tuesday, June 15, 2010
Silly Bird
Hello all, this week's challenge over at the PPA Yahoo Group is to create a bird with punches. Here is my version of a funny bird. Sorry I didn't take pictures for the tutorial. You should all be able to figure it out from the written instructions. Thanks


Stampin' Up! Punches needed:
Ornament for body in brocade blue
1 3/8" Circle for head in brocade blue
1 1/4" Circle for belly in bashful blue
2 Step Bird punch for wings in brocade blue
3/4" Circle for eyes in white
3/8" circle from Punch Pack in bashful blue
1/4" circle for pupils in black
small heart from Heart to Heart for beak in so saffron
pointy petal flower from Boho Blossom for feet in so saffron
flower from Punch Pack in brocade or bashful blue for feathers on head
Assembly of Bird:
1) sponge edges of all brocade and bashful blue pieces with not quite navy ink
2) for feet, cut 2 petals off of the pointy boho blossom flower.
3) sponge edges of saffron pieces with more mustard ink
4) glue the 3/8" blue circles onto 3/4" white circles. Glue black 1/4" circle onto blue circle of eye. Add highlighting with white gel pen. Attach eyes to head with dimensionals.
5) attach beak to head with dimensional
6) glue belly circle onto ornament body.
7) glue feet onto body
8) attach wings to body with dimensionals
9) cut 3 narrow black strips for the feathers on the head. Glue onto back of head and attach flower punches with dimensionals
10) attach head to body with dimensionals
My card was made following the SCS Sketch Challenge #283.
Monday, June 14, 2010
Bird Punch Challenge
Hi All, I posted a bird punch challenge over at the Paper Punch Addiction Yahoo Group today. I will be posting another fun tutorial this week featuring a cute and fun bird. I am so looking forward to getting that new 2 Step Owl punch coming out in the new Stampin' Up! catalog! Several great new punches coming out. I can't wait to start creating with them!
Monday, June 7, 2010
Pop Up Birthday Cake
Hello everyone, have you been admiring the popup cake cards made with the Sizzix XL die but don't have a Sizzix Big Shot or the XL Die? I'll show you how to make the pop up card without the special die!


Instructions:
1) Cut 3 circles in the following diameters: 3", 2 1/2" & 1 1/2". I used a Petite Circle Nestability set but you could use a coluzzle or other circle cutting system. I used the dies pictured on the left. Be sure to cut it out of sturdy cardstock like Stampin' Up! colored cardstock. Flimsy cardstock will not hold the shape of the card very well.

2) Cut 2 pieces 2 7/8" x 1/2" out of sturdy cardstock. Cut 2 pieces 2 5/8" x 1/2" out of sturdy cardstock. Cut 2 pieces 2 1/8" x 1/2" out of sturdy cardstock. These pieces will be used to attach the circles to the inside of the card.
3) For the center support of the cake, cut a piece of sturdy cardstock (I used watercolor paper) or thin chipboard 3 1/2" x 7/8". Score at 3/8", 1 1/4", 2 1/8" and 3". Corner round the end with the 1/2" scored section. Place on the score board vertically and score at 1/4" from the rounded end down to the second to last score line as shown. Score down from 5/8" from the rounded end down to the second to last score line as shown. To reinforce the piece, cut 2 strips of cardstock 2 1/4" x 3/8". Glue the strips on each side as shown.


4) Score the 2 7/8" pieces as follows. Place on a score board or Fiskars cutter with a score blade and score at 1/2". Rotate paper all the way around and score in at 1 1/2". The finished piece should have a score at 1/2" and 1 3/8". Score the other 2 7/8" long piece in the same way.
5) Score the 2 5/8" pieces as follows. Place on a score board or Fiskars cutter with a score blade and score at 1/2". Rotate paper all the way around and score in at 1 1/4". The finished piece should have a score at 1/2" and 1 3/8". Score the other 2 5/8" long piece in the same way.


Instructions:
1) Cut 3 circles in the following diameters: 3", 2 1/2" & 1 1/2". I used a Petite Circle Nestability set but you could use a coluzzle or other circle cutting system. I used the dies pictured on the left. Be sure to cut it out of sturdy cardstock like Stampin' Up! colored cardstock. Flimsy cardstock will not hold the shape of the card very well.

2) Cut 2 pieces 2 7/8" x 1/2" out of sturdy cardstock. Cut 2 pieces 2 5/8" x 1/2" out of sturdy cardstock. Cut 2 pieces 2 1/8" x 1/2" out of sturdy cardstock. These pieces will be used to attach the circles to the inside of the card.
3) For the center support of the cake, cut a piece of sturdy cardstock (I used watercolor paper) or thin chipboard 3 1/2" x 7/8". Score at 3/8", 1 1/4", 2 1/8" and 3". Corner round the end with the 1/2" scored section. Place on the score board vertically and score at 1/4" from the rounded end down to the second to last score line as shown. Score down from 5/8" from the rounded end down to the second to last score line as shown. To reinforce the piece, cut 2 strips of cardstock 2 1/4" x 3/8". Glue the strips on each side as shown.


5) Score the 2 5/8" pieces as follows. Place on a score board or Fiskars cutter with a score blade and score at 1/2". Rotate paper all the way around and score in at 1 1/4". The finished piece should have a score at 1/2" and 1 3/8". Score the other 2 5/8" long piece in the same way.
6) Score the 2 1/8" pieces as follows. Place on a score board or Fiskars cutter with a score blade and score at 1/2". Rotate paper all the way around and score in at 3/4". The finished piece should have a score at 1/2" and 1 3/8". Score the other 2 1/8" long piece in the same way.

7) Place the largest circle on your fiskars cutter (or use a ruler and xacto knife). Line up the fold line in the cutting track. Lift the rail and position the cutting blade at 1 1/4". Lower the rail and drag the blade to 1 3/4".

8) Place the second largest circle on the fiskars cutter. Line up the fold line in the cutting track. Lift the rail and position the cutting blade at 1". Lower the rail and drag the blade to 1 1/2".
9) Place the smallest circle on the fiskars cutter. Line up the fold line in the cutting track. Lift the rail and position the cutting blade at 1/2". Lower the rail and drag the blade to 1". All 3 circles should now have a 1/2" slit in the center on the fold line. This is where the cake support piece will be threaded through.
10) Use a strong adhesive like sticky strip and attach the scored strip pieces to the appropriate circles.
The 2 7/8" pieces go with the largest circle. The 2 1/8" pieces go with the smallest circle. The scored section that is 1/2" wide is the end that is taped to each side of the circle at the center point (opposite to the fold line).

11) Add sticky strip to each scored section of the strips attached to the circles. DO NOT do one continuous line of tape along both scored sections. They must be cut apart.

12) Create your base for the card. It needs to be nice and sturdy. I layered 2 pieces of cardstock on top of eachother and then scored down the center. Don't score 2 pieces and then try to tape them together. You will get some pulling and the paper won't lie down right. The base pieces of cardstock are 8 1/2" x 5 1/2" and 8 1/4" x 5 1/4". Use a strong adhesive to attach the layers together. Then, score at 4 1/4" or fold card in half and sharpen fold with a bone folder.

13) Attach the center support piece to the center of the card. Line up the 3/8" scored fold at the center of the card attach with sticky strip as shown.

14) Fold in the 1/4" scored sides and hold in place. Thread the largest circle onto the support through the center slit. Slide the piece down past the first 2 scored sections until you hit the last scored section where you can't slide it down any further. Open up the folded tabs on each side of the section above where the circle is resting. The 2 attached strips will fold down and under the circle and attach to the card base as shown.


15) Slip the next largest circle onto the center support piece and slide down to the folded out section. Fold out the tabs above it to lock into place. The 2 attached strips will fold down and under the circle and attach to the top of the largest circle at the center, as shown.


16) Slip the smallest circle onto the center support piece and slide down to the folded out section. Fold out the tabs above it to lock into place. The 2 attached strips will fold down and under the circle and attach to the top of the circle below it as shown.

17) Cut 3 strips of designer paper. Thinner paper works better because it easily folds and opens when the card is closed. For the bottom cake layer, cut a strip 10" x 1". For the middle layer, cut a strip 8 1/2" x 1" and for the top layer 5 1/2" x 1".
18) Secure one end of the longest strip to one of the folded pieces on each side of the bottom circle. Carefully wrap the paper around the circle. Be sure not to pull the paper under the circle. Have it just resting against the edge of the circle. Be sure to fasten the paper on the piece at the other side of the circle at the midway point around. Continue around the circle and tape in place back at the starting point. Repeat the same steps with the middle and top layers. The finished cake will look like this. You can make a candle for the top of the cake or attach a ribbon like I did in the sample.


When you fold the card closed, the cake should fold in on itself. The card will be bulky in the center. You can use a ribbon or make a belly band to wrap around the outside of the card to keep it closed.
For my sample, I punched out some cupcakes and put a couple on the inside. I decorated the outside of the card and used a ribbon to tie the card closed.
I hope you have some fun and try out this technique yourself!
Want a printable version of this tutorial? click on the link below to download:
https://www.sugarsync.com/pf/D8472508_837_657778728
Want a printable version of this tutorial? click on the link below to download:
https://www.sugarsync.com/pf/D8472508_837_657778728
Friday, June 4, 2010
Pretty Daisy
Hello everyone, to go along with our weekend challenge over at my Yahoo Group, I created this tutorial to make this 3D Daisy.

You will need the Stampin' Up! Jumbo Flower punch and Boho Blossoms. I punched these out of shimmery white because the paper has more body but you could also use whisper white or vanilla cardstock.
1) Punch 6 jumbo flower and 2 boho blossom (2 each of 3 flowers)
2) Lay out on a paper towel and spritz flowers with gold Smooch. If you don't have gold smooch, you can use water (or Fabreeze for nice smelling flower)


4) Wad up the pieces into little balls. This will wrinkle the paper and make it more pliable and easy to work with.

5) Flatten pieces back out. For the center of the flower, pierce a hole in the center of each of the boho blossoms and string them onto a chocolate courduroy brad, smallest to largest. Set aside.

6) Pierce a hole into the center of one jumbo flower. This will be the base piece.
7) Working with one flower at a time, grip the piece at the center and gather to form the petal.


You will need the Stampin' Up! Jumbo Flower punch and Boho Blossoms. I punched these out of shimmery white because the paper has more body but you could also use whisper white or vanilla cardstock.
1) Punch 6 jumbo flower and 2 boho blossom (2 each of 3 flowers)
2) Lay out on a paper towel and spritz flowers with gold Smooch. If you don't have gold smooch, you can use water (or Fabreeze for nice smelling flower)

3) Spritz the boho blossoms with chocolate colored Smooch.

4) Wad up the pieces into little balls. This will wrinkle the paper and make it more pliable and easy to work with.

5) Flatten pieces back out. For the center of the flower, pierce a hole in the center of each of the boho blossoms and string them onto a chocolate courduroy brad, smallest to largest. Set aside.

6) Pierce a hole into the center of one jumbo flower. This will be the base piece.
7) Working with one flower at a time, grip the piece at the center and gather to form the petal.


8) Glue the petal onto the base flower. Line up the petal onto one of the petals of the base flower. Create 5 total petals and glue onto base flower.


9) Attach the flower center to the flower base. You can add some additional dimension and detail by sponging the edges with more mustard ink.

Subscribe to:
Posts (Atom)