
As promised, here is the step by step tutorial for the Accordion Peeker Card Technique. This technique was featured on my card from yesterday's LFIF challenge. For the tutorial on making the sailor boy, please go HERE.


Instructions:
Step 1
For the accordion spines, cut 2 pieces of 5-3/4" x 8" card stock (Soft Sky in sample). On the long side, score at 1/2", 1", 1-1/2", 1-3/4", 2", 2-1/2", 3", 3-1/4", 3-1/2", 4", 4-1/2", 4-3/4", 5", 5-1/2", 6", 6-1/4", 6-1/2", 7", 7-1/2". Accordion fold each piece.

Step 2
On the backside of each accordion piece, apply glue to the 1/4" wide sections and pinch those sections together. The finished piece should look like this:

Accordion fold the pieces again so that they look like this. The 1/4" glued sections will point to the inside of the card when assembled.

Step 3
For front of card, cut a 6" x 6" piece of card stock (Soft Sky used). Cut a frame into the center (circle, nestabilities, etc.). Make sure you have at least 1" from opening of frame to outer left and right edge of card stock. This way, the accordion spines do not show on the inside. Decorate the front of card (I punched out waves and added a few to bottom of card with some overlapping bottom of frame). Flip card front over and attach accordion to each side of card as shown (glue or tape 1/2" scored section on end of accordions making sure that the glued 1/4" sections are facing up at this point). When attaching accordions to the card front, align the second score line along the outer edge of the card. A close up is provided).


Step 4
Cut a 6" x 6" piece of card stock for back of card (Soft Sky) and decorate. Make 4 panels to go on inside of card, attached to accordion spines. Create 4 panels for inside of card. If you want, you can cut pieces 5" x 5" and cut a frame in the center of each piece for the "tunnel" look. For mine, I cut 4 strips of cardstock 5" x 1" and attached die cut pieces of designer paper to the top of each for waves.

Step 5
On the back side, attach one panel at a time. The one you want to be in the front will go on first, etc. Glue the ends of each panel onto the 1/4" wide sections as shown.

Step 6
Attach the second panel in the same manner. You may want to shift it upward so that it is visible behind the first panel.

Step 7
Attach the 3rd and 4th panels in the same manner, again shifting it a little upward so it's more visible.

Step 8
After all panels are in place, fold over the ends of each spine and add glue or tape along outer 1/2" section as shown. Attach back of card, making sure to align edges of front and back pieces.
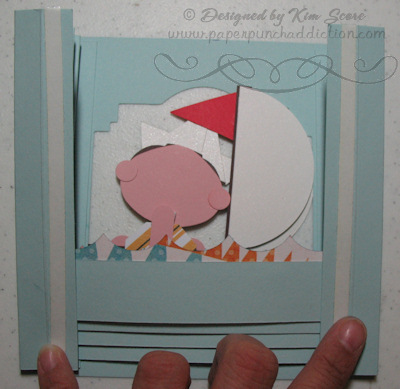
The fully assembled card will look like this on the side.

ENJOY! Please link to my tutorial if you create an accordion peeker card and post online. Thank you!
10 comments:
Kim, you never cease to amaze me with your creativity! This peeker card is SO cute and SO clever!! xxx
What a great idea, and a great tutorial. Thanks so much for sharing.
Love Joan xx
Kim, you have definitely outdone yourself this time! This little sailor boy is adorable! I love the dimension this card gives. Thanks!!!
The sailor boy is so cute thank you for sharing this with all of us.
This is one of those cards that make me want to squeal with delight. Thank you so much for sharing how to do it. I can't wait to give it a try.
This is FANTASTIC, Kim! I love it! Thanks so much for sharing it.
Hugs,
Brandi
I am never disappointed when I come to your blog. This is a great tutorial and a darling card!
I Hope all is well with you Kim
Kim, I love your card with the accordion and the waves, it's really cool! I love how you showed us each step too!!
I love your card! Tami had a link here so we could see the instructions on how to make one. Can you e-mail the instructions to me so I can print it off. I would really like to try one. Thank you so much. Edwina Brown edwinabrown@comcast.net
All I can say is OMG!!! This is such a fun looking card and any little one (or big person) would be full of smiles when they receive it. TFS
Post a Comment