
Bear for all Seasons
Build a Bear
The outfits for these 2 classes are interchangeable. If you don't have the Sizzix Build-a-Bear die, there are step by step instructions for making a punch art bear in the Bear for all Seasons class. I also added a panda bear tutorial HERE (note: this bear is a little different from my bear in the Bear for all Seasons class).

Punches Needed:
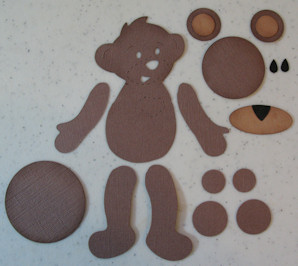
Build-a-Bear Sizzix Die – 2 in close to cocoa
1 3/4" Circle (112004) in cocoa – BELLY
1 3/8” Circle (104401) in cocoa – HEAD
3/4" Circle (107217) in cocoa – EARS & JOINTS
1/2" Circle (104390) in caramel – EARS
1/2" Circle (104390) in cocoa – JOINTS
Small Oval (107304) in caramel – MUZZLE
Heart to Heart (113694) small heart in black – NOSE
Teardrop for eyes (may use Boho Blossoms cut apart for eyes)
Supplies Needed:
Adhesive (liquid monoadhesive is best)
Dimensionals
4 mini brads (any color will work)
Uni-bal white gel ink pen
Zig detail black pen
Paper piercing tool & mat
Instructions:
Die cut 2 build a bears. One will be used for the body/head and the other one will be used for the arms & legs. Cut the arms and legs off of one bear so that only the head and torso remain. Cut the arms and legs off the other bear as shown. Sponge all of the pieces with cocoa ink.

Glue the caramel circles onto the cocoa circles to make ears. Glue ears onto head (lined up with outer edge of ear on die cut). Attach head onto body with dimensional. Glue heart onto muzzle and clip away top of heart. Attach muzzle with dimensional. Glue on teardrop eyes and add detailing to face.
Glue a 1/2" circle onto the end of each arm to create a shoulder. Glue a 3/4" circle onto the end of each leg to create a leg joint.

Punch a hole in the center of the joint pieces on the end of each arm and leg as shown. Punch holes into body and attach arms and legs with mini brads as shown.

Put one dimensional in the center of the belly piece and attach to the body. Use only one, or the joints will hit the dimensionals and not be free moving.
1 comments:
Very cute! I love how you adapted the die to be a jointed bear. Thank you so much for sharing your tutorial!
Post a Comment