Monday, October 31, 2011
Saturday, October 29, 2011
Friday, October 28, 2011
Peachy Keen LFIF Challenge 27 - Creepy Cute
The Peachy Keen Let's Face it Friday challenge this week was to create a cute Halloween character. I finally got a chance to use my new PK-695 The Uglies 1-1/8" stamp set. The funny greeting is from the CB-05 Goblin Greetings set. For the instructions, please see below. The design team has awesome projects to share as well. Check them out HERE. Play along on the challenge for a chance to win a fabulous prize!


Instructions:
For the monster, punch the following pieces out of Wisteria Wonder:
2 Ornaments for the Head & Body
2 Modern Labels for the legs
2 Small Ovals for the feet
(2) 1/2" Circles for paws (not shown in picture)
1 Small Oval for the Elegant Eggplant
1 Boho Blossom in Elegant Eggplant
1 Boho Blossom in Shimmery White
2 pieces created by punching the 1-1/4" Circle first then lining up the ornament over the punched hole. Once piece is for the eye stalks and the other is for the arms

Stamp the eyes from PK-695 The Uglies 1-1/8" stamp set with black ink. Add highlights to eyes with a uni-bal white gel pen. Cut out the eyes and sponge the eyelids with eggplant ink. Stamp the mouth onto the ornament and color in the tooth. Attach the eggplant nose with dimensional and add highlights. Sponge regal rose ink onto cheeks.
Cut the tops off the ornaments. Cut the bottoms off the small oval feet pieces. Cut the white boho blossom into quarters for claws on feet and paws. Sponge edges of all wisteria pieces with eggplant ink.
Glue eye stalks onto back of head. Attach eyes to stalks with dimensionals. Glue arms to top of body. Glue eggplant blossom onto top of body. Glue claws onto feet and paws. Attach paws to arms with dimensionals. Glue legs onto body. Attach feet to legs with dimensionals.

For the card, I used the tutorial on Jan Tink's site HERE. I like the long oblong shaped easel card.
Punch Inspiration 10/28/11
I have a super cute punch art project for the Peachy Keen challenge today. Please come back at 10 am to check it out!
Thinking of you Beary Much
Baby Booties card
Lattice Thanks
Halloween Spinner
Merry Mini
It's a Zoo
3-D Project:
Grinch
Video of the day:
Billfold
Thinking of you Beary Much
Baby Booties card
Lattice Thanks
Halloween Spinner
Merry Mini
It's a Zoo
3-D Project:
Grinch
Video of the day:
Billfold
Thursday, October 27, 2011
Wednesday, October 26, 2011
Tuesday, October 25, 2011
Monday, October 24, 2011
Punch Inspiration 10/24/11
Thanks to everyone that was patient as I took a few days off! I had a great time in Green Bay spending some stamping time with my Peachy Keen sisters!
Spice Cake Pumpkin
Simply Scored Christmas Card
Three Little Babushka Dolls
Mountie Punch Art
3-D Projects:
25 and Counting Frame
Candy Wrapper Tubes
Joker Hat
Video of the day:
Advent Calendar Tutorial
Spice Cake Pumpkin
Simply Scored Christmas Card
Three Little Babushka Dolls
Mountie Punch Art
3-D Projects:
25 and Counting Frame
Candy Wrapper Tubes
Joker Hat
Video of the day:
Advent Calendar Tutorial
Sunday, October 23, 2011
Inspired by Stamping Design Team
Hello all, I'm excited to tell you about my newest opportunity! I was invited to join the Inspired by Stamping design team and I'm so excited to share my creations featuring these beautiful stamps! Joanna's greeting sets are truly gorgeous and I look forward to stamping her sentiments on so many of my creations!
To check out the other design team members, please jump on over to Joanna's blog HERE

To check out the other design team members, please jump on over to Joanna's blog HERE
Thursday, October 20, 2011
Blog Candy Winner
Congratulations to Pam D. who won the $15 gift certificate from Peachy Keen. This is what Pam had to say:


Pam, please email me paperpunchaddiction@gmail.com to claim your prize. thanks
Wednesday, October 19, 2011
Punch Inspiration taking a few days off
Good morning all, I'm taking a few days off from posting my daily inspiration posts until Monday. Lately, I've been spending an inordinate amount of time surfing the net instead of creating. I don't know if it's because the sites I frequent haven't been posting as often? I also haven't seen a whole lot of exciting samples that feature punches on splitcoast. I figure that taking a few days off will give me a lot more to look through when I'm selecting links.
I'm off to meet my peachy keen sisters this weekend so I plan on some fun creative time and hopefully will have a lot to share with all of you when I get back!
Thanks for your patience.
I'm off to meet my peachy keen sisters this weekend so I plan on some fun creative time and hopefully will have a lot to share with all of you when I get back!
Thanks for your patience.
Tuesday, October 18, 2011
Peachy Keen Tuesday Sketch Challenge #63
This is the first time I have participated in the Tuesday challenge but I just HAD to show you all this darling new Peachy Keen stamp set called Goblin Greetings. It's from the new line of stamps called Country Bumpkin. Check out the new stamp release and blog hop from yesterday HERE. Lots of great ideas yesterday and today for the new sets. Today I'm using the CB-05 Goblin Greetings. This little guy was crying out to be paper pieced. I have included a picture of the pieces in case you want to try it out yourself. It's so much easier to get the perfect look for those of us that can't color like a pro! If you want a step by step tutorial on paper piecing, check out my Tanner Turkey project from yesterday.


There are lots of other great projects at the challenge site. Check it out HERE. Play along on the challenge for a chance to win a fabulous prize! Submissions must be linked up at the challenge site by 10/31. You don't have to use Peachy Keen stamps for the challenge, just follow the sketch provided. Of course, we would love to see your Peachy creations if you have them!

here are the pieces I used to create him. Tip: sponge the edges of each piece with an ink that is 1 or 2 shades darker for the most dramatic effect. I used Wild Wasabi sponged with garden green, tangerine tango sponged with cajun craze, wisteria sponged with eggplant and saffron sponged with mustard.
Monday, October 17, 2011
Peachy Keen Mini Release Blog Hop with Prizes
If you came here from Lisa's site, then you are following along fine. Today we celebrate more new stamps from Peachy Keen! They recently unveiled their new line of stamps called Country Bumpkin. They also have some great new face stamps you'll want to check out HERE. Sorry I was late getting my project posted today! I totally dropped the ball.
BLOG CANDY ALERT!
Every design team member on the hop has a $15 gift certificate to Peachy Keen to give away! To enter the drawing, first jump on over to the Peachy Keen blog HERE and check out the Country Bumpkin sets. Then, leave a comment on this blog post with the name of your favorite set! I will draw a random winner on Thursday.
And now through Wednesday (11:59 PM CDT) Peachy Keen Stamps is offering an additional 10% off their tiered discounts when you use PROMO CODE: MINIHOP at checkout! Total savings of up to 20% OFF on everything in the shop! Go HERE to start shopping!
I got to use this cute little guy called Tanner Turkey from the Country Bumpkin collection. Would you believe there is NO COLORING on this little guy? I used a technique called paper piecing and if you want to learn how to make rich looking pieces like this without having a shred of coloring skills, than check out my tutorial below.

Head on over to Heidi's site for more great ideas!
Paper Piecing Tutorial
all card stocks, designer papers and inks from Stampin' Up!
1) Stamp CB-03 Tanner Turkey onto Crumb Cake cardstock with Black Staz On ink. Cut out and sponge chest, face, neck and thighs with Chocolate Chip ink. This is optional, but you can use a blender pen and some ink from your Chocolate Chip pad to add shadows around the outer edges of the sponged body parts. Stamp wings on Crumb Cake cardstock, cut out and sponge edges with Chocolate Chip ink.
2) Stamp feet and beak on Pumpkin Pie cardstock. Cut out and sponge edges with Cajun Craze ink. Stamp hat onto Bravo Burgundy cardstock, cut out and sponge edges with Chocolate Chip ink. Stamp feathers around neck onto Very Vanilla cardstock, cut out and lightly sponge edges with More Mustard ink.
3) Stamp hat buckle onto More Mustard cardstock and cut out. Stamp hat band onto Early Espresso card stock and cut out. Stamp waddle onto Cherry Cobbler card stock and cut out.
4) Stamp turkey onto 2 different print papers. Cut out the outer feather pieces on one and the main feather pieces on the other. Lightly sponge the edges with a coordinating ink. I used a retired SU paper for my turkey.

5) Glue main feathers onto body. Glue feet and beak onto body. Glue hat onto head. Glue neck feathers onto body.

6) Glue outer feather edges on. Glue hand band and then buckle on hat. Glue waddle onto face. Attach wings to body with dimensionals.

Versatile Blogger Award
Thank you to Jani who recently awarded me the Versatile Blogger award. I appreciate it!

As a recipient of The Versatile Blogger Award, there are 3 rules to follow…
1. Thank the person who awarded you.
2. Tell 7 things about yourself that your readers may not know.
3. Award 7 other bloggers with this award.
7 Things about me (please excuse me if I repeat myself. I have gotten several of these awards to I lose track of what I have told you all):
1) I love horror movies and sci-fi. My favorite show on tv right now is The Walking Dead.
2) When I was 4, I lived in the same Chicago suburb as John Wayne Gacy at the height of his killing spree.
3) When I was 12, I went trick-or-treating for the last time, wearing my Mom's wedding dress.
4) I once performed an IQ test and received a score of 141.
5) I love 80's music (who doesn't? LOL)
6) I make the best carrot cake on the planet (my opinion anyway).
7) I don't have a graceful bone in my body! I'm lucky I don't trip over my own feet. LOL
And now I want to pass on the reward to the following people:
Tracy Wray with Craftycat 957 Designs
Valita with Valita's Fresh Folds
Donna with Butternut Sage Designs
Kathy with The Paper Stamper
Viv with Crafting Haven
Punch Inspiration 10/17/11
Halloween Door card
Red Lego Birthday
3-D Projects:
Haunted House Favor Box
Christmas Treat
Tissue Travel Case
Video of the day:
Corner Embellishments
Red Lego Birthday
3-D Projects:
Haunted House Favor Box
Christmas Treat
Tissue Travel Case
Video of the day:
Corner Embellishments
Sunday, October 16, 2011
Saturday, October 15, 2011
Blog Candy Winners!
Congratulations to the following blog candy winners!
The winner of the October subscription to Craft Project Central is lisa808 who had this to say:


The winner of the October subscription to Craft Project Central is lisa808 who had this to say:
The 2 winners of the Inkspirations4U Christmas 2011 Edition was Laura and GAscrappnGramma who had this to say:

Congratulations ladies! I sent emails to lisa808 and Laura. GAscrappnGramma, please email me to claim your prize. Thanks!
Accordion Peeker Card Technique
As promised, here is the step by step tutorial for the Accordion Peeker Card Technique. This technique was featured on my card from yesterday's LFIF challenge. For the tutorial on making the sailor boy, please go HERE.


Instructions:
Step 1
For the accordion spines, cut 2 pieces of 5-3/4" x 8" card stock (Soft Sky in sample). On the long side, score at 1/2", 1", 1-1/2", 1-3/4", 2", 2-1/2", 3", 3-1/4", 3-1/2", 4", 4-1/2", 4-3/4", 5", 5-1/2", 6", 6-1/4", 6-1/2", 7", 7-1/2". Accordion fold each piece.

Step 2
On the backside of each accordion piece, apply glue to the 1/4" wide sections and pinch those sections together. The finished piece should look like this:

Accordion fold the pieces again so that they look like this. The 1/4" glued sections will point to the inside of the card when assembled.

Step 3
For front of card, cut a 6" x 6" piece of card stock (Soft Sky used). Cut a frame into the center (circle, nestabilities, etc.). Make sure you have at least 1" from opening of frame to outer left and right edge of card stock. This way, the accordion spines do not show on the inside. Decorate the front of card (I punched out waves and added a few to bottom of card with some overlapping bottom of frame). Flip card front over and attach accordion to each side of card as shown (glue or tape 1/2" scored section on end of accordions making sure that the glued 1/4" sections are facing up at this point). When attaching accordions to the card front, align the second score line along the outer edge of the card. A close up is provided).


Step 4
Cut a 6" x 6" piece of card stock for back of card (Soft Sky) and decorate. Make 4 panels to go on inside of card, attached to accordion spines. Create 4 panels for inside of card. If you want, you can cut pieces 5" x 5" and cut a frame in the center of each piece for the "tunnel" look. For mine, I cut 4 strips of cardstock 5" x 1" and attached die cut pieces of designer paper to the top of each for waves.

Step 5
On the back side, attach one panel at a time. The one you want to be in the front will go on first, etc. Glue the ends of each panel onto the 1/4" wide sections as shown.

Step 6
Attach the second panel in the same manner. You may want to shift it upward so that it is visible behind the first panel.

Step 7
Attach the 3rd and 4th panels in the same manner, again shifting it a little upward so it's more visible.

Step 8
After all panels are in place, fold over the ends of each spine and add glue or tape along outer 1/2" section as shown. Attach back of card, making sure to align edges of front and back pieces.
The fully assembled card will look like this on the side.

ENJOY! Please link to my tutorial if you create an accordion peeker card and post online. Thank you!
Friday, October 14, 2011
Peachy Keen LFIF Challenge #26
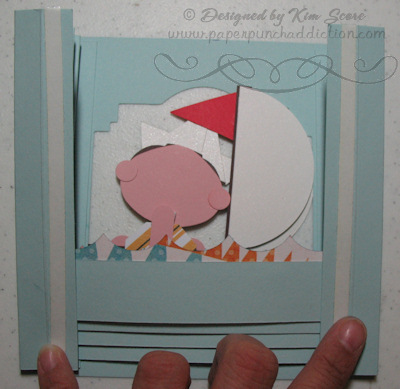
The Peachy Keen Let's Face it Friday challenge this week was to evoke the feeling of "windy" "whimsy" or "flourish". My card is completely literal as I created a little boy in a sail boat. On my little sailor boy, I used the Peachy Keen PK-485 Snowmany Faces 1-1/8" face stamps. The other girls on the team created fantastic projects, so be sure to check them out at the challenge site HERE. The instructions for creating the sailor boy is below. Please come back tomorrow for the step by step instructions for creating an Accordion Peeker card. It's hard to tell from the photo but this card has 4 layers inside with staggered waves which give it a deep 3-D look.

Ornament in Blushing Bride for head
Word Window in Blushing Bride for neck
(2) 3/8" Circles from Itty Bitty Shapes Punch Pack in Blushing Bride for ears
(2) 1/2" Circles in Blushing Bride for hands
(3) petals from Blossom Petals in Chocolate Chip for hair
Large Tag in designer paper for shirt (neckline punched with 3/8" Circle)
(2) Petite Pennants Builder in white for hat
Petite Pennant builder in designer paper for flag
large heart from Heart to Heart for boat helm
Cut the following pieces:
1/2" x 2-1/4" white strip for hat brim
1/4" x 7" strip of Chocolate Chip for sail post
4" wide circle in Chocolate Chip cut in half for boat
3" wide circle in Shimmery White for sail


Sailor Boy Instructions:
Punch the following pieces with Stampin' Up! punches:Ornament in Blushing Bride for head
Word Window in Blushing Bride for neck
(2) 3/8" Circles from Itty Bitty Shapes Punch Pack in Blushing Bride for ears
(2) 1/2" Circles in Blushing Bride for hands
(3) petals from Blossom Petals in Chocolate Chip for hair
Large Tag in designer paper for shirt (neckline punched with 3/8" Circle)
(2) Petite Pennants Builder in white for hat
Petite Pennant builder in designer paper for flag
large heart from Heart to Heart for boat helm
Cut the following pieces:
1/2" x 2-1/4" white strip for hat brim
1/4" x 7" strip of Chocolate Chip for sail post
4" wide circle in Chocolate Chip cut in half for boat
3" wide circle in Shimmery White for sail

For the hat brim trim the ends of the white strip as shown. Sponge the edges of hat pieces with crumb cake ink. Layer the 2 pennants as shown. Attach hat brim with dimensionals.
Trim top off ornament. Stamp face with black. Add highlights to eyes with unibal gel pen. Use blender pen to add regal rose ink to nose. Stipple regal rose ink onto cheeks. Sponge edges of blushing bride pieces with blushing bride ink. Glue blossom petals onto head for hair. Glue ears onto head. Glue neck onto back of tag.

Attach head to neck with dimensional. Attach hat to head with dimensionals. Cut chocolate chip circle in half for boat. Fold strip of chocolate chip in half and glue together for sail post. Glue post onto boat. Cut white circle in half to create sails. Layer semicircles with dimensionals. Glue onto post. Glue flag onto post. Glue heart onto helm. Attach sailor onto back of boat with dimensional. Attach hands with dimensionals.

PLEASE COME BACK TOMORROW FOR THE STEP BY STEP TUTORIAL ON THE ACCORDION PEEKER CARD.
Punch Inspiration 10/14/11
Please come back at 10 am today for another fun punch art project! You don't want to miss this one!
Glittery Ornaments
Richard's Bowtie
Punch Art Mario Characters
3-D Projects:
Happy Little Turkey
Halloween Owl Treat Box
Christmas Tree Box
Video of the day:
Gently Falling Treat Pouch
Glittery Ornaments
Richard's Bowtie
Punch Art Mario Characters
3-D Projects:
Happy Little Turkey
Halloween Owl Treat Box
Christmas Tree Box
Video of the day:
Gently Falling Treat Pouch
Thursday, October 13, 2011
Wednesday, October 12, 2011
Tuesday, October 11, 2011
InkSpirations 4U Christmas Edition & Free Passes
It's time for another edition of InkSpirations 4U! I'm happy to announce that I have a beautiful project in this upcoming edition. You can subscribe for $24.99. You get so much for this price! Check out the details HERE.
I have 2 FREE PASSES to share! Leave a comment here and I'll draw for the winner on Saturday.

I have 2 FREE PASSES to share! Leave a comment here and I'll draw for the winner on Saturday.

Monday, October 10, 2011
Win a subscription to Craft Project Central
I just realized that I forgot to include with my Craft Project Central the prize for this month! Please leave a comment here by this Friday. I will randomly draw from the comments and the winner will receive a free subscription to October over at Craft Project Central.
If you do not have an email on your commenting profile, please make sure to come back and check to see if you won! Here is a picture of my project over at CPC once again. Just a reminder that if you want the tutorial for this project and 9 other fabulous projects, please visit CPC and subscribe to October HERE.

If you do not have an email on your commenting profile, please make sure to come back and check to see if you won! Here is a picture of my project over at CPC once again. Just a reminder that if you want the tutorial for this project and 9 other fabulous projects, please visit CPC and subscribe to October HERE.
Punch Inspiration 10/10/11
Hooty Spook
Joy Fold Card
Pretty Trees
3 Wise Owls
3-D Projects:
Turkey Candy Legs
Snowman Luminary
Fall Treat Pouch
Video of the day:
Greeting Card Box
Joy Fold Card
Pretty Trees
3 Wise Owls
3-D Projects:
Turkey Candy Legs
Snowman Luminary
Fall Treat Pouch
Video of the day:
Greeting Card Box
Sunday, October 9, 2011
Peachy Keen & SVG Attic Joint Blog Hop Continues
I had so much fun participating in the Peachy Keen & SVG Attic join blog hop yesterday that I whipped up another project last night to share with you all. For a chance to win a prize and check out my other projects, please visit my blog post from yesterday HERE.
If you are loving the SVG Attic cut files and Peachy Keen stamps have used for my projects, be sure to check out the sales going on right now!
Peachy Keen has a bundle discount of 25% on the newly release stamps and a 10% discount on everything else in the store. Check out the sale HERE.
SVG Attic is offering a 30% discount on all purchases with the discount code of HOP. This code is active through Sunday so be sure to make your purchase by then! Check out the site HERE. Be sure to use the discount code in the shopping cart when checking out.
Now on to my project! For the pumpkin girl, I used the cut file from the Thankful Friends Collection at SVG Attic. For her face, I used the Peachy Keen PK-484 Snowmany Faces Assortment stamp set. For the pumpkins, I used the cut file from the Pumpkin Patch Collection at SVG Attic. For the faces, I used the Peachy Keen PK-550 Pumpkin Faces stamp set. I used a uni-ball white gel pen to add the white hilights to the eyes and regal rose ink sponged on the cheeks and colored on the nose. This card style is a sliding pop up card. For my basic written & video tutorial, please go HERE. The greetings are from My Creative Time and Rubbernecker Stamps.

I hope you enjoyed my project! For a chance to win a $25 gift certificate from SVG Attic or one of 2 Peachy Keen face assortment sets, please be sure to leave a comment on my post from yesterday HERE.
Check out the following blogs for more fantastic inspiration on Day 2 of the joint blog hop:
Peachy Keen & SVG Attic Joint Blog Hop
Thank you so much for joining us for the Peachy Keen Stamps/SVG Attic Hop! If you've just come from Cristina's blog, then you are hopping along just fine. If not, make sure you start at the beginning over at Peachy Keen Stamps' blog and the SVG Attic Blog so you don't miss a single chance to win prizes from Peachy Keen and SVG Attic! You have until 11:59 Sunday night to leave comments on the hop stops. The more places you comment at, the better your chances to win!
Check out how easy Peachy Keen face stamps are to use with SVG Attic's adorable cuts! I had so much fun creating these Halloween cuties using the Spooky Friends collection from SVG Attic. For images and details, please go HERE. For the adorable faces, I used the Peachy Keen PK-496 Everyday Character Face Parts for 7" - 9" figures and the Peachy Keen PK-451 Wide Eyed Kids 1-1/8" set. I created the banner using the Sizzix Pennant die (retired). The medallions between the characters was created with the 2-3/8" Scallop Circle, 1-3/4" Circle and Bat punches by Stampin' Up!. For my mummy pocket card, I used the same svg collection paired with the Everyday Character face parts. The greetings are from Rubbernecker stamps.


Check out how easy Peachy Keen face stamps are to use with SVG Attic's adorable cuts! I had so much fun creating these Halloween cuties using the Spooky Friends collection from SVG Attic. For images and details, please go HERE. For the adorable faces, I used the Peachy Keen PK-496 Everyday Character Face Parts for 7" - 9" figures and the Peachy Keen PK-451 Wide Eyed Kids 1-1/8" set. I created the banner using the Sizzix Pennant die (retired). The medallions between the characters was created with the 2-3/8" Scallop Circle, 1-3/4" Circle and Bat punches by Stampin' Up!. For my mummy pocket card, I used the same svg collection paired with the Everyday Character face parts. The greetings are from Rubbernecker stamps.


Be sure to leave a comment here and at each stop for a chance to win a $25 gift certificate from SVG Attic or a Peachy Keen Faces Assortment Set (Uglies or In Stitches). Winners will be announced on the 10th at the SVG Attic and PKS Challenge Blogs.
If you got lost, you can check out the whole hop list here:
PKS Blog - http://peachykeenstamps.blogspot.com/
SVG Attic Blog(Jessica) - http://svgattic.blogspot.com/
Angelica - http://www.handmadebyangelica.com/
Ruthie - http://septemberninth.blogspot.com/
Vivienne - http://craftinghaven.blogspot.com/
Anna Dawn - http://memoriesbyannadawn.blogspot.com/
Janice Wilson - http://stampingwithjanice.blogspot.com/
Raven - http://love4stamps.blogspot.com/
Lisa Buttafuoco - http://our2angelsinheaven.blogspot.com/
Cristina - http://www.craftingwithcristina.com/
Kim Score - http://paperpunchaddiction.com/
Subscribe to:
Posts (Atom)