
Hello everyone! my newest technique is here. This technique will be featured on Technique Wednesday on Split Coast Stampers in January 2011. It looks complicated but is very easy to make.


Instructions:
1) Score the following pieces as follows:


Pumpkin Patch
Happy Lashes Snowman
Raggedy Andy
Easter Bunny
Forest Festivities
Please see the video tutorial HERE.


Cardstock Pieces Needed:
5 1/2" x 4 1/4" card base (marina mist)
5 3/8" x 4" pop up back piece (bashful blue)
1 1/2" x 9" sliding wrap (pear pizazz)
1 1/2" x 2 1/2" pop up piece (bashful blue)
1" x 2 3/4" card back prop piece (marina mist)
1/2" x 1 1/2" pop up prop piece (bashful blue)
round tab punch (or substitute) for the pull tab (marina mist)
You need to use a sturdy cardstock for these pieces. I used Stampin' Up! cardstocks. The pear and bashful blue is their textured and the marina mist is the smooth finish. For the wrap piece (pear), you could use a piece of designer series paper or a thinner paper since this doesn't have to support weight on any of the pieces.
Instructions:
1) Score the following pieces as follows:
- 5 3/8" x 4" - score at 1 1/2"
- 1 1/2" x 9" - score at 2" & 6 1/4"
- 1 1/2" x 2 1/2" - score at 1/2"
- 1" x 2 3/4" - score at 1/2" on each end
- 1 1/2" x 1/2" - score at 1/2" on each end

2) Put strong adhesive on the pop up piece, pop up prop piece and card back prop piece. I recommend sticky strip or scor tape. Put the adhesive next to the score line. For the 1" x 2 3/4" piece, the tape goes on one end, flip over to the wrong side and put tape on the other end.

3) Put adhesive on the pop up back piece as shown. One line of tape along the score line and the other along the bottom. Adhere the wrap piece with the bottom edges of the pieces lined up. There will be about 1/8" from each edge of the bashful blue piece to the score lines on the wrap.

4) Tape on the pop up piece centered at the score line as shown.

5) Adhere the pop up prop piece centered on the score line of the pop up piece as shown.

Fold the pop up prop piece to the right as shown and peel the backing off the sticky strip.

Carefully hold this little piece in place. Grab the pop up back to the right and fold over and press down to adhere to the little prop piece.

When you open it back up, it should look like this:


6) Push the pieces flat and then flip it over. Tape the wrap in place. Make sure that it is not adhered to the back of the bashful blue piece. It needs to be free sliding.


7) Flip the card back over. Grab the pop up back piece and fold over to the left to allow access to the back of it. Tape the back prop piece centered with the score line on one end about 1" from the edge of the card base piece as shown.

Take the backing off the tape on the other end of the prop. Make sure that the sliding wrap piece is lined up at the bottom edge of your card base piece (marina mist) and then flatten the pop up back piece back down on top of the prop piece as shown.

Now, when you slide the green wrap piece to the right, the back of the card will automatically pop up as shown below.

This view is the front of the card in the open position. Attach the pull tab on the bottom of the card base and write "pull" on it.

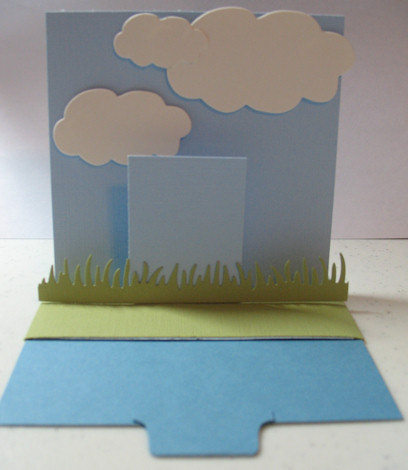
8) Decorate your card as desired. For my card, I used a MFT clouds die to cut some clouds out of shimmery white cardstock and attached them with dimensionals. Then I used an MFT grass die to cut 2 strips of grass. I attached the bottom edge of one piece to the pop up piece as shown. Then, I attached my tree to the bottom of the pop up piece and then attached another strip of grass over the top of that. The wonderful tree and owls are from the Sheltering Tree stamp set by My Favorite Things.
I stamped 2 greetings. One on the card base that will show up when the card is open and one on the sliding wrap piece that shows when the card is closed/open. If you wanted to, you could wrap a ribbon or even add other embellishments to the front of the wrap piece.
I hope you all have as much fun making a sliding pop up card as I did!!!! Looking forward to seeing your creations. If you make a card, please post a link here in the comments. Also, please post a link on your blog or SCS gallery to my site for the step by step instructions. THANKS!
HERE ARE MORE SLIDING POP UP CARD IDEAS!!
Happy Lashes Snowman
Raggedy Andy
Easter Bunny
Forest Festivities
12 comments:
That looks like fun! Thanks for sharing, I'm bookmarking you!
What a neat card. Thanks for sharing a great tutorial.
Great idea, and tutorial Kim! Can't wait to share the link and tutorial with my customers and downline.. You're a genius!
oh kim such a fab idea very clever
hugs tracyx
Is there a YouTube video. I am getting confused.....
I haven't made a utube video for this tutorial yet. I plan on making one for when it gets put up on Split Coast Stampers on technique wednesday. It's not scheduled to be put on SCS until January 2011. I made the written tutorial so that a "caveman can do it". Hopefully, there isn't too much difficulty in figuring out the written instructions.
WOW awesome card , love the pop out.. thanks for the tutorial.
I am such awe of your gorgeous creations! This is another winner and thanks again for the tutorial!
On another note, everytime I come here I get red blocks across the whole page from your headers. I don't know if anyone else has this problem or not. I use MSN Explorer and I haven't tried another browser to see if it does it on something else.
Hi, if anyone gets red blocks, it's most likely a glitch with your browser. I know it's an occasional problem with internet explorer. Try using Google Chrome instead. Not only is it faster, but the security is better!
great tutorial. Thanks
What's MFT die? The one you used for the grass? I love this tutorial and thank you for sharing!
the grass and cloud dies used can be found at My Favorite Things website.
Post a Comment